Today’s cameras have many settings, which can seem daunting when you start. But you don’t need to fiddle with all these settings at first. I’m here to guide you through the most important settings you need to know for shooting video:
- Framerate
- Aperture
- Shutter speed (and shutter angle)
- ISO
- White balance
You may think these are the same features you need to know if you’re doing photography. True, but there are some crucial differences in how you approach these settings when you make videos, which I’ll cover in this article.
Table of Contents
Framerate

The framerate is the rate at which the consecutive images (frames) in your film or video sequence are recorded and displayed per second. Framerates on a digital camera are written as fps, which means frames per second.
Though many more framerates are available today, 24 fps is still considered to provide the most cinematic experience by some movie connoisseurs. This is probably because we’ve grown accustomed to this look from thousands of films over the years.
Most common frame rates
Two other common framerates are 25 fps (most of the world) and 30 fps (US). Both are popular in broadcast television because they can portray things like fast-moving sports without looking jagged.
It is beyond the scope of this article to discuss the details of why they differ (and why 30 fps is sometimes written as 29.97 fps, etc.). In short, the differences between the two relate to the main frequency in the US (60 Hz) and the rest of the world (50 Hz), as well as the PAL and NTSC television standards.
Higher frame rates and slow-motion
Many videographers prefer to shoot at 60 fps. This gives you extra versatility in post-production, although you sacrifice that coveted 24 fps cinema look.
Recording at 60 fps is a good trick for playing back your footage in slow motion in your edit. You record at 60 fps and drag the footage onto a 24, 25, or 30 fps timeline. This gives you a nice slow-motion look and tricks like speed ramping.
Some cameras crop the image size when they record at high frame rates (in slow-motion) of 120 and above. So, instead of recording a cropped version of 120 fps, you can have better image quality by recording at 60 fps and slowing down the footage to 120 fps when you edit your video.
Read more on slow-motion video.
Aperture

Aperture means opening, hole, or gap.
In a camera lens, the aperture is the opening in the diaphragm through which light passes. The role of the diaphragm is to control the amount of light that passes through the aperture at its center.
The light travels through the aperture in the diaphragm through a series of optics and—in DSLR cameras—mirrors before it finally hits the camera sensor.
When you open up the lens diaphragm, the gap in the center gets bigger and lets in more light. When you close the diaphragm, less light passes through.
The relationship between aperture, F-stop, and depth of field (DoF)

The aperture on lenses meant for photography is written in F-stops. The ‘F’ stands for ‘focal length’. Photography lenses are the most common for entry-level and prosumer videographers (I use them myself all the time), so I’ll focus on them here.
The F-stop is a theoretical value that designates the lens diameter—length relationship. You can set the aperture to some predefined steps, the ‘stops,’ which are written as f/X.X.
A row of F-stops can look like f/1.4, f/2.0, f/2.8, f/4.0, f/5.6, f/8.0, f/11, f/16, and f/22. The smaller the f-stop number, the more light is let through the aperture. Fx, f/1.4 lets in lots of light, and f/22 doesn’t.
It’s a bit different on cinema lenses, where the light reaching the sensor is measured in T-stops.
Read more on the differences between photography and cinema lenses.
How F-stops are connected to the depth of field (DoF)
The F-stop influences the depth of field (DoF). The DoF is the area around the plane of focus in which the image appears acceptably sharp.
At f/1.4, you’ll see a clear separation between the foreground and the background, i.e., the foreground or the background is in focus. This is known as a shallow depth of field.

© Jan Sørup
At f/22, there is no clear separation between the foreground and the background; both are in focus. This is known as a deep depth of field.
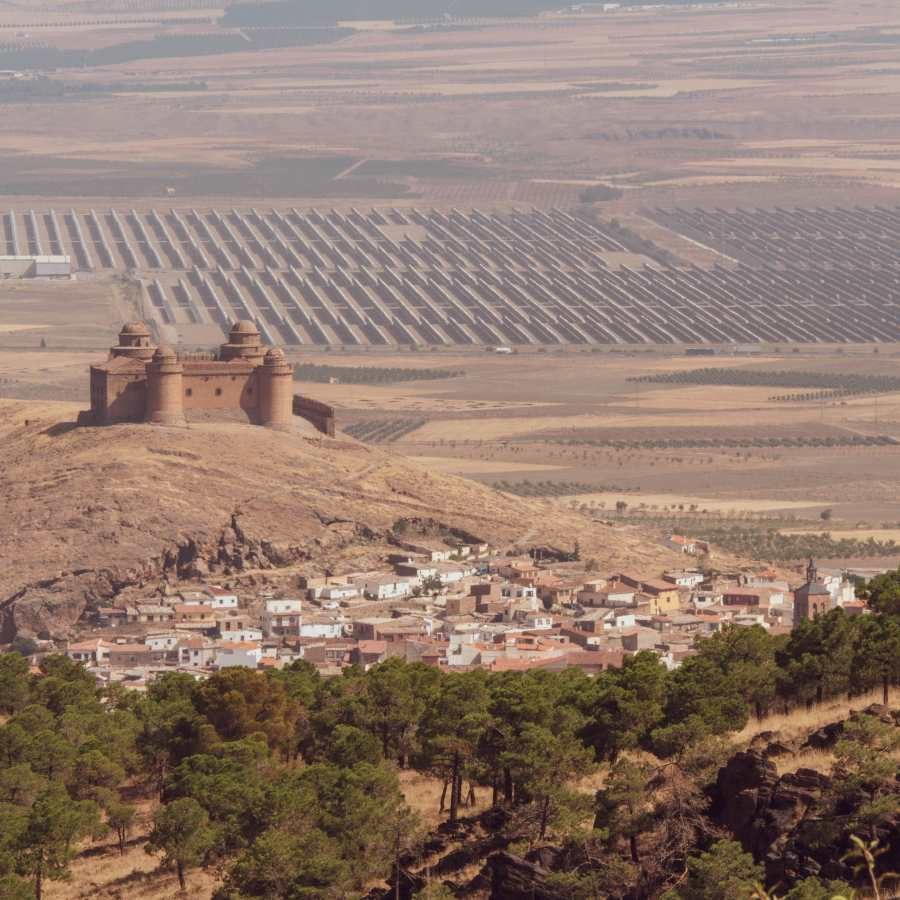
© Jan Sørup
This is a simplified explanation because the DoF also depends on the focal length of your lens and your proximity to your subject. For example, at 24 mm at f/2.8, you must get closer to my subject to achieve a shallower DoF than at 150 mm at the same F-stop.
On manual/analog lenses, the f-stops are set on the lens itself, whereas on automatic/digital lenses, the camera can control them.
How the diaphragm of a camera lens affects the bokeh
The diaphragm in a camera lens comprises a series of blades that can be rounded or straight.
The number of blades varies from lens to lens. On cheaper lenses, it is common to find 5 or 6 blades. On professional camera lenses, it is common to find nine blades. But I’ve seen lenses with both 14 and 17 blades!
The number of blades combined with their shapes greatly affects how the bokeh will appear. The more blades, the rounder the bokeh balls.
What is bokeh?
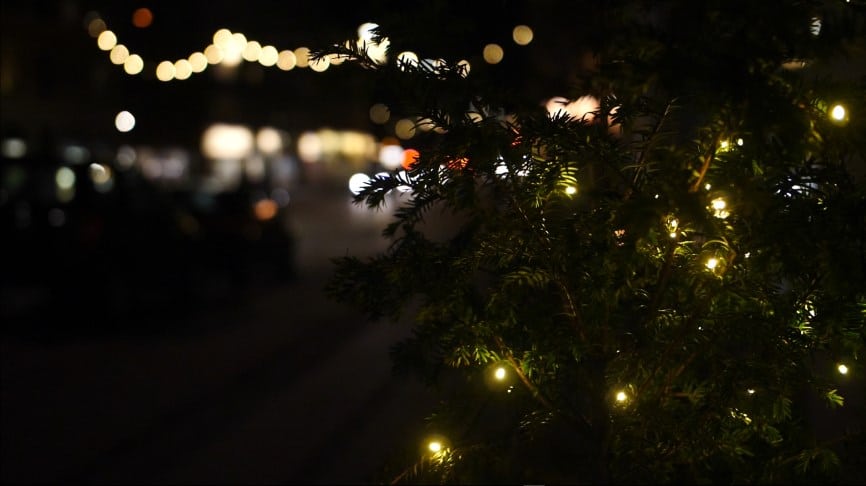
Bokeh balls in the background. Screengrab from a low light test I did in Copenhagen a while back © Jan Sørup.
Bokeh is a name for how a lens aesthetically renders the out-of-focus parts of an image.
How a lens renders bokeh becomes apparent when you look at out-of-focus lights, which result in bokeh balls.
High-quality lenses often have bokeh balls that are round and very smooth looking. Cheaper lenses might have bokeh balls, which are skewed. Sometimes, you can even count the number of blades of the diaphragm because you can see the edges of the aperture shaping the bokeh.
That’s not to say you can’t get cheap lenses, which produce nice round bokeh, too. For some people, a perfectly round bokeh is a must in a high-quality lens. But bokeh is so much more than just bokeh balls. I don’t think one type of bokeh is better than other types.
I find it too much when I see shots taken with expensive high-end lenses, which produce perfectly round bokeh balls and a silky smooth background. I prefer a bit of grit in my blurred backgrounds.
Shutter speed

The shutter speed of a camera is when light travels to the sensor for each photo or frame of a film.
When the shutter speed is less than one second, it is usually written as a fraction of a second, such as 1/25, 1/100, or 1/5000. Short shutter speeds are referred to as short exposures.
If the shutter speed is over a second, it is written in seconds, fx as 1″, 5″, or 30″. Long shutter speeds are referred to as long exposures.
Short shutter speeds make it possible to freeze the time in a frame.
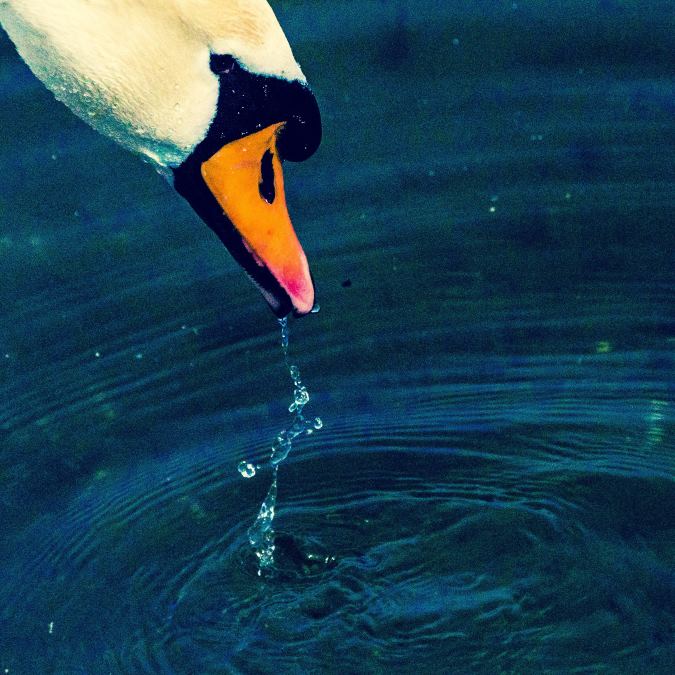
© Jan Sørup
Long exposures let in lots of light and make it possible to shoot in low-light conditions. It is used in astrophotography, fireworks photography, and to achieve special effects.
Long exposures also introduce motion blur – especially if your subject moves a lot. Motion blur can be desired or undesired depending on your goal.
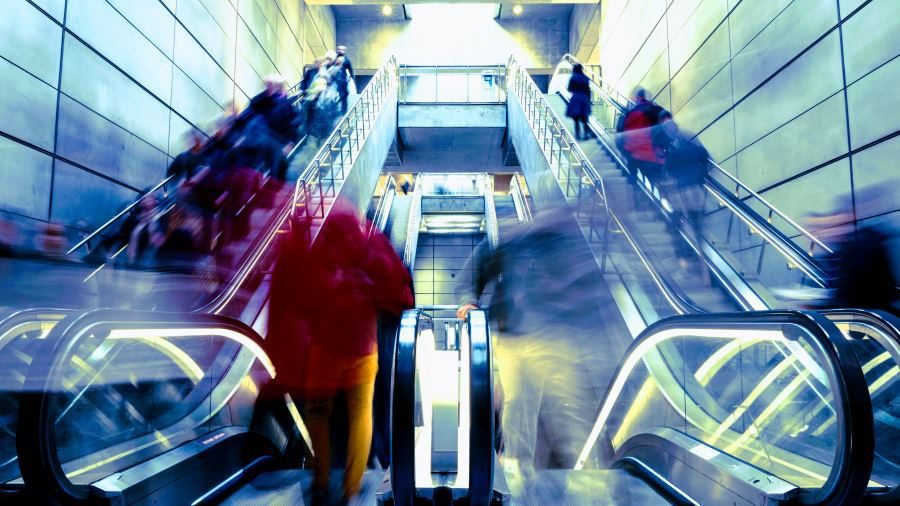
© Jan Sørup
How to choose the correct shutter speed for video
The general rule is that the shutter speed should double the frame rate.
For example, if you’re using a frame rate of 24 frames per second (fps), the shutter speed should double that, i.e., 1/48.
If your camera doesn’t let you choose 1/48, you should choose the number closest to it, like 1/50.
By using a shutter speed double the frame rate, you get a screen result that mimics the way the human eye sees in real life.
Shutter speed vs shutter angle – which one should you choose and why?
Traditional cinema cameras don’t refer to the time interval when
You can choose whether you prefer shutter speed or shutter angle on some digital cameras.
A shutter angle set to 180 degrees corresponds to a shutter speed set to double the frame rate.
The benefit of using a 180-degree shutter angle instead of a shutter speed is that the camera automatically adjusts the exposure time to your frame rate.
In other words, with a shutter angle of 180 degrees, your exposure time (shutter speed when we think of photography) will always be set to double your frame rate.
Example:
Let’s say you shoot at 25 fps per second with a shutter speed of 1/50 but want to shoot a scene at 60 fps. Now, you must remember to change your shutter speed to 1/120 to get the same motion blur.
If you instead shoot with a shutter angle of 180, you don’t need to change anything to get the same amount of motion blur when you change frame rates, as the camera does this automatically.
So whenever you change your frame rate during a shoot, your exposure will always follow—there is no need to set it manually each time, as you would have to if you used the shutter speed.
However, if you have a background in photography, it might take some time to get used to thinking about angles instead of speed, especially if you want to get creative.
ISO

In digital cameras, ISO is used to digitally enhance the brightness of your footage after the light has passed through the lens and hit the sensor but before it is converted from analog to digital signal.
In essence, ISO is a digital gain of the analog signal coming from the sensor.
ISO is handy as an extra brightness boost in low-light conditions, but it should be used carefully. Shooting higher ISO values also introduces more digital noise.
Higher ISO = More Digital Noise
Me!
Example: let’s say you are shooting a scene in low light where extra lighting isn’t an option.
You’ve opened the aperture as much as possible and decreased the shutter speed to let as much light as possible hit the sensor without any motion blur. But still, your scene is coming up too dark.
Now you have the option to increase the ISO. But if you boost the signal too much, you’ll also introduce digital noise to your image.
New high-end mirrorless cameras get usable results for still photography all the way ISO up to ISO 51200.
A camera such as the Sony a7iii can shoot in an ISO range of 50-204,800. It is literally possible to see in the dark at ISO 204,800, but the noise levels make the footage extremely grainy.
Read tips on how to use the available light to your advantage in low-light situations.
Native ISO, aka Base ISO
Digital cameras come with a “base ISO” or “native ISO” – whichever you prefer.
The base ISO is where the camera has the highest signal-to-noise ratio, i.e., where your footage will come out the cleanest in noise – if your scene is properly exposed. And that is a big if because conditions are rarely ideal.
The native ISO varies from camera to camera, even in different recording modes.
For example, the native ISO of the ARRI Alexa Mini is 800. The same goes for the RED Scarlet. The Panasonic GH5 has a native ISO of 400. The native ISO for Sony a7S II is 3,200 when shooting in 4K, but 3,200 when shooting in FullHD.
Dual Native ISO
Some cameras have dual native ISO. This means they have two separate circuits running from the sensor, which means there are two optimal settings for the camera.
For example, the Panasonic GH5S has a dual native ISO of 400 and 2,500. When you boost the signals, you start to increase the ISO. From ISO 400, you also increase the noise. When you hit ISO 2,500, the noise disappears as the second circuit takes over.
Because the noise floor is reset once you hit ISO 2,500, the camera can take more usable footage, even in low-light situations.
Read more on Panasonic GH5 vs GH5S.
Don’t (always) blame the ISO for a noisy image. Blame your Sensor!
Keep in mind that ISO isn’t the only factor in noise. The sensor size also plays a crucial role. Bigger sensors allow more light to be captured in each frame, leading to less noise than small sensors.
A full-frame DSLR or mirrorless camera will generally produce less noisy images at the same ISO than fx a micro 4/3 sensor camera.
In photography, you can use techniques such as photo stacking and long-exposures, (up to 30 seconds or more), and
In video production, we can’t utilize the same techniques. Instead, we’re limited by the relationship between frame rate and shutter speed/angle
– at least to some extent – if we want to get natural-looking movements in our film.
If your scene is underexposed and you can’t add more lights, crank up the aperture, or change the shutter speed, then increasing the ISO is generally better than capturing underexposed footage.
The noise you create through ISO to get a good exposure during recording (shot noise) will always be less than the noise you get from trying to correct underexposed footage in post-production (read noise).
This is because ISO works by boosting the analog signal from the sensor before it is transformed into digital. Boosting an analog signal is less noisy than boosting the digitally stored footage.
The exposure triangle
The aperture, shutter speed, and ISO make up the exposure triangle.

The Exposure Triangle © Jan Sørup
The exposure triangle shows the interrelationship between aperture, shutter, and ISO in a graphical way.
It shows that there is more than one way to achieve a brighter, less noisy image in camera. However, every change you make will affect the image in some way.
Also, when working with video, the shutter speed/angle is often limited to double the frame rate (e.g., set to 1/50 or 1/60 of a second if you’re not filming slow-motion footage). This only leaves you with the ISO and the aperture to play with.
White balance
The white balance setting in your camera is there to help you overcome the challenges of colors appearing differently under varying lighting conditions.
You access the white balance settings on your camera by pressing the WB button.

How you dial in the white balance influences the colors in your video production. You must set the white balance to correspond to the surrounding light of your scene.
White balance is also important to match several hours of video footage taken at different times and locations to look the same color balance.
The purpose of white balance is to display any white objects in a scene as white.
Remember that setting the “correct” white balance here refers to returning to a neutral state of white. Setting the right white balance is crucial to display the correct colors as closely as possible to how we perceive them with our eyes.
Sounds easy, right? I mean, white is white. Except it isn’t! The problem is that white looks different under different lighting conditions.
For example, if you place a white T-shirt under candlelight, it will have an orange tint. If you place the same T-shirt under a fluorescent light, it will look bluish.
Different types of lights have different color temperatures, measured in Kelvin.
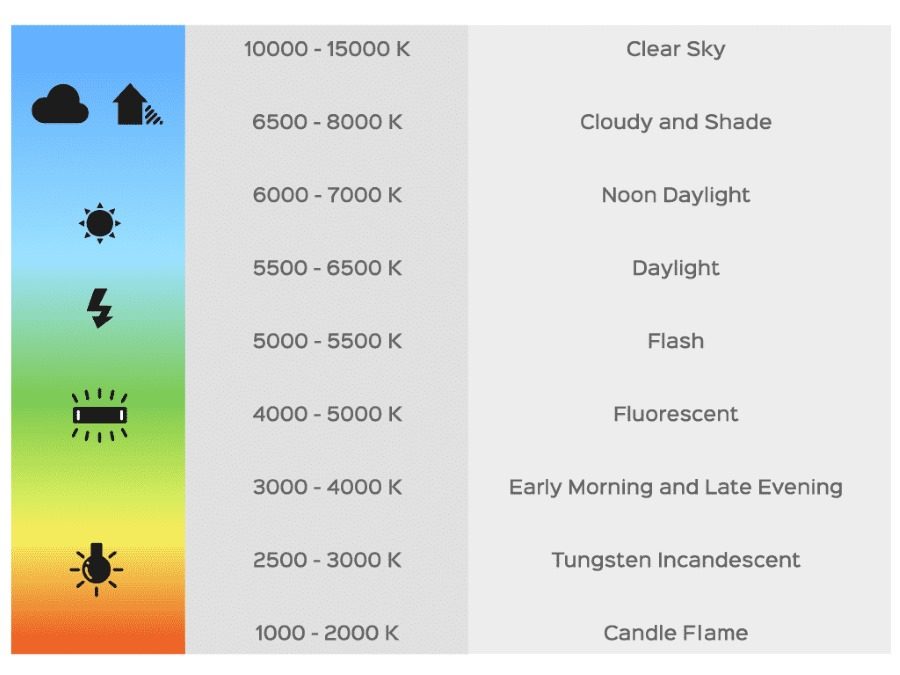
For example, a candle gives off an almost orange light with a color temperature of around 1,000-2,000 Kelvin. Regular tungsten bulbs shine with yellow light and have a color temperature of 2600-3600 Kelvin. Normal daylight has a color temperature of around 5500-5600 Kelvin.
Read more on color temperature for video.
Auto white balance
Most beginners set the white balance to “auto.” The problem with this approach is that if the light suddenly changes in your scene, e.g., if a cloud blocks out the sun or you move around a lot, the light can change rapidly.
If you film under mixed lighting conditions, the camera can also have trouble finding the right white balance.
The camera continuously tries to match the changes in lighting by adjusting the white balance automatically. The result is that you will end up with footage that changes colors all the time.
Auto white balance presets

The next best thing is to use your camera’s auto white balance presets. The presets are dialed in, matching Kelvin’s corresponding color temperature.
For example, the tungsten setting will tell the camera that a white t-shirt appears orange because it is filmed under warm lights at around 3200 Kelvin. That way, the t-shirt will appear white instead of orange on your final footage.
When you use a preset, the white balance setting in your camera will stay locked, which means you won’t end up with footage that changes colors every second.
The problem with this approach is that the presets might not perfectly match the lighting conditions. So you’ll still have to make some minor color corrections in post-production.
Different approaches to setting the Custom White Balance Manually
Adjusting the right white balance is the best way to set it manually. Most professional cameras allow you to dial in the precise color temperature of the surroundings.
But how do you know the color temperature of your surrounding environment?
There are several ways to do this, and it is beyond the scope of this article to discuss the fine details. The precise way you can dial in the settings depends on your camera. You’ll have to dive into the camera’s manual to see what is possible and how you can do it.
Working in a controlled environment
If you have the luxury (who does?) of working in a controlled studio environment, you can dial in the exact temperature on your lights.
So if you set your lights to, e.g., 5600 K, then you also set the white balance on your camera to 5600 K. And voila! Perfect white balance.
Now you need to find a studio with no windows where you can control all the lighting.
Using a white card

Using white, grey, and black cards, like those pictured above, ensures you have a common reference point, e.g., white, in all your shots.
You have your subject hold up the white card before each change of scene or lighting. When you come to the editing phase, you can use a tool like the “white balance picker” in Adobe Premiere Pro to quickly choose the white in the scene by simply clicking on the white card in your footage.
Using a grey card
The grey card can also be used to set the white balance. A grey card is usually 18% grey (though there are slight variations depending on which card you buy).
This is because digital images are made using varying amounts of Red, Green, and Blue (RGB). An equal amount of each of the three colors results in grey.
Both white and black are just shades of grey.
White is RGB=255, 255, 255
A shade of dark grey is RGB=180,180,180
Middle grey (18%) is RGB=50,50,50
A shade of dark grey is RGB=15,15,15
Black is R=0, G=0, B=0
You take a picture of the grey card under the lighting conditions in which you will film. It is good practice to ensure that the grey card always fills the whole frame so the camera doesn’t get confused by other colors in your scene. Also, ensure the card is in focus to avoid any blur of colors. Switch to manual focus if necessary.
Now go into your camera’s menu settings and choose to set a custom white balance. Then, choose the photo of the grey card and tell the camera to set the white balance based on that.
Every camera is different, but the principle remains the same. Some cameras even allow picking the grey card area in the photo if you can’t make the card take up the whole frame.
The grey card is also helpful for setting the right exposure, e.g., if you shoot in LOG. But that is a topic for another article.
The black card is a remnant of the past and is rarely used. I’ve never found any use for it myself.
Use a color checker passport

Another way to set a white balance is to use a color-checker passport.
A color checker passport includes different shades of grey, as well as white and middle grey. So you can use the principles explained above.
However, a color-checker passport also lets you keep track of how many other colors appear under different lighting conditions. This is useful for color correction and color grading in post-production.
Get creative with White Balance Settings
Don’t be afraid to move away from the correct way and creatively use a white-balance setting. There are many times when you don’t want that neutral look. Instead, you want to keep that warm orange or cold bluish tint.
You can also deliberately completely change the look and feel of a scene with white balance:
For example, you can choose a tungsten setting (3200 Kelvin) under normal daylight to get a bluish image. Or you can use a cloudy/shade white balance (6,500+ Kelvin) during the golden hour just after sunset to enhance those golden colors.
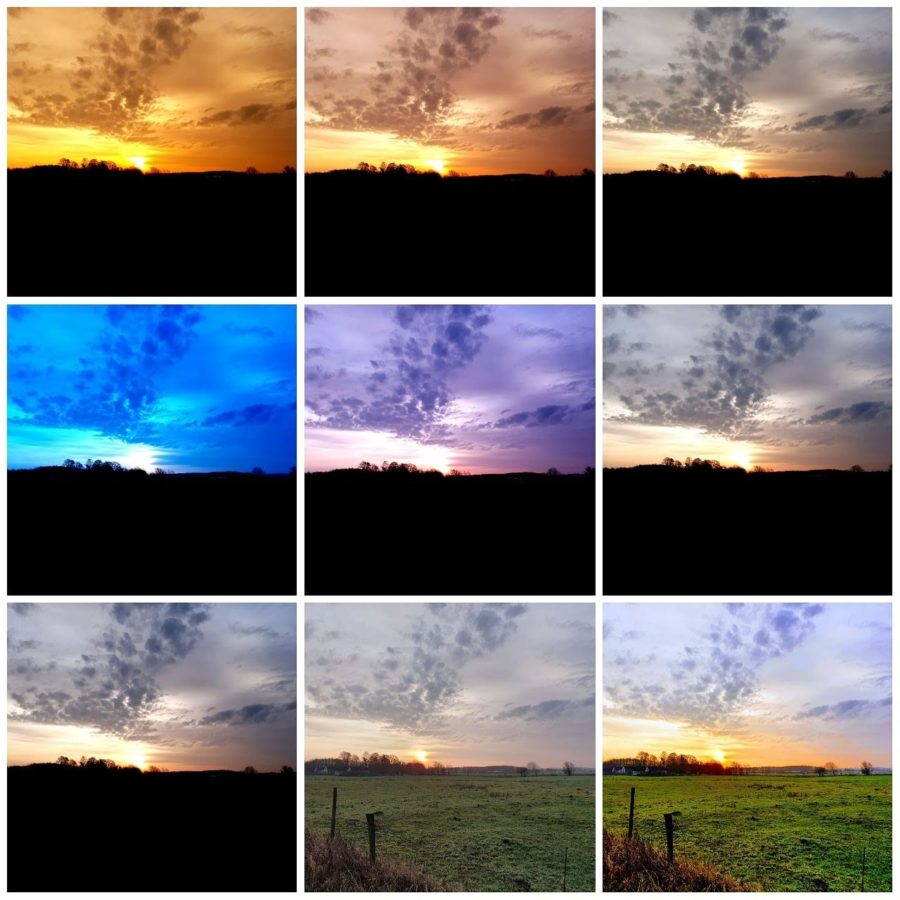
This example shows how you can drastically change the look and feel of a photo/video simply by getting creative with the white balance in the camera.
This is useful if you want to shoot an interior scene with moonlight coming through the windows—but you have to do it during the day when the sun is out. By simply choosing a tungsten setting (3200 K), the sunlight coming through the windows will look bluish-like moonlight.
Also, remember that when shooting a video, your color temperature will constantly change if you move around a lot in a mixed-lighting environment.
In that sense, there is no “correct” way to set the color balance. Use your eyes and judgment.
Up Next: Lawrence Sher Breaks Down The Cinematography & Colors In Joker (2019)

i enjoyed this article , came here through one of your posts on reddit.
keep up the good work and passing the knowledge on
Hi ukBrett
Thanks for reaching out. That’s really kind of you. I’m glad you found the article useful.
Best Regards,
Jan
Wow … really enjoyed this article… right to the point … very useful… Thanks