DISCLOSURE: AS AN AMAZON ASSOCIATE I EARN FROM QUALIFYING PURCHASES. READ THE FULL DISCLOSURE FOR MORE INFO. ALL AFFILIATE LINKS ARE MARKED #ad
I see this question getting asked a lot – especially from beginners interested in buying their first video camera: do video cameras take pictures?
Many digital video cameras like camcorders, DSLRs, and mirrorless cameras will allow you to take stills while recording motion pictures (simultaneous recording). Most cameras will interrupt recording to take a photo, but you can always grab a frame from your recording using software on your computer.
That’s the short answer. As to how this is done and what quality of photos you can expect is a bit more complicated. And the exact features available depends on the camera you have.
However, you can always grab a frame from your recording using software on your computer. You can find a list of free software for video editing here: Best Free Video Editing Software (Mac, PC, Linux, Online).
However, just grabbing a frame from your video might result in a low-resolution photo with lots of motion blur. So there are a few tips and tricks to know before pushing that record button if you want to get high-quality photos as well.
So let’s have a look at the best ways you can take pictures while recording video and see how it’s done.
Method 1: grab a still photo from you video recording
One of the differences between camcorders and a hybrid camera like a DSLR or mirrorless with video capabilities is that camcorders are a video-first camera, while the others are photo-first cameras.
Now, hybrid cameras like the Panasonic GH5S, Panasonic S1H, BlackMagic Pocket Cinema 4K or 6K are video cameras first, but their form factor still springs from the traditional photography camera. And they’ll allow you to take photos as well.
However, camcorders spring from video cameras and thus many come with only poor photo capabilities – or no photo capabilities at all.
That’s why it is useful to know how to extract a photo from a video.
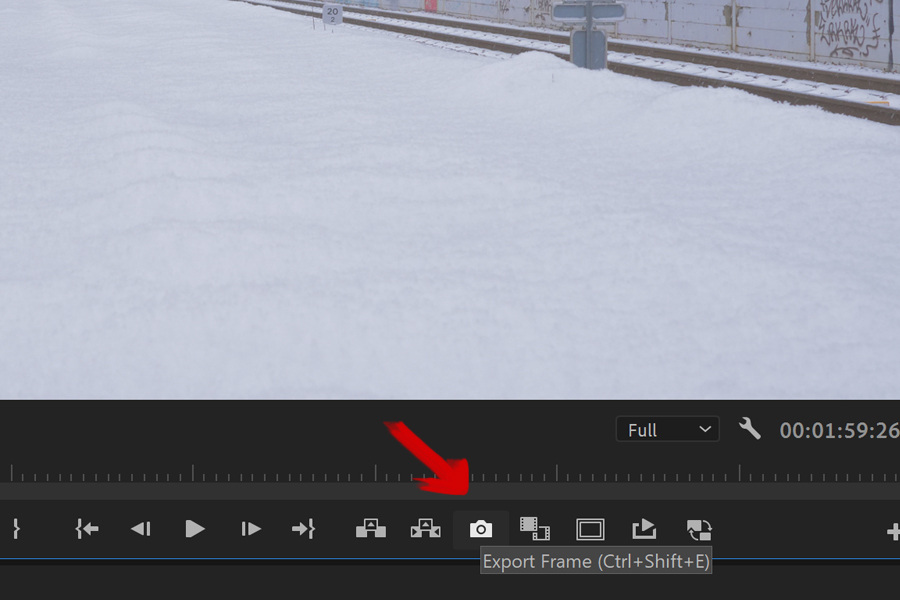
If you’re using a professional video editing software like Adobe Premiere Pro, you can use the “Export Frame” tool to quickly export a jpg (if you don’t see the tool below your video, click the plus sign on the right).

But you don’t need Premiere Pro. You can use free editors as well. Fx, here’s how to do it in Lightworks:
With that said, there are a few things to consider even before you record to make sure you get the highest picture quality possible when you extract a photo from a video following this method:
Choose the highest resolution possible
Today even our smartphones can easily take photos with resolutions above 20 MegaPixels. A 20 MP photo with an aspect ratio of 4:3 is 5248 pixels wide and 3936 pixels tall (5248×3936 pixels).
If you own a camcorder that shoots in both FullHD and 4K, I’d recommend you choose the 4K mode if you want to extract photos as well.
If you’re looking to purchase a camcorder, I’d recommend you take a look at our guide Best Professional Camcorder For Any Budget (HD, 4K) first.
FullHD is the same as only 1920×1080 pixels which will result in a grainy photo. 4K (or UHD-1) has a resolution of 3840×2160 that will result in a sharper image – especially on higher resolution screens, or if you were to print it out and hang it on your wall.
A frame grabbed from a 4K video is roughly the equivalent to an 8 MP photo which has a resolution of 3264×2448 pixels.
But a frame grabbed from a FullHD video of 1980×1080 pixels is approximately the same resolution you’ll get from a 2-3 MP photo which has 1600×1200/2048×1536 pixels. That’s not a lot if you want crisp looking photos.
In other words, don’t expect large scale prints with a high PPI (Pixels Per Inch) with pictures grabbed from a video. There’s a reason why professional photographers use cameras with 50 MP for those kinds of prints.
But grabbing a frame and exporting it as a photo is fine for social media and small prints, if you want to have a memorable moment extracted from a video to hang on your wall.
But there’s another thing to consider as well, and that is the frame rate and shutter speed.
Set the highest frame rate possible to avoid motion blur in your photos

The rule of thumb when it comes to recording video is that you should set your shutter speed to double that of the frame rate to get natural-looking video footage.
If you’re new to photography and video, I recommend you read our guide How to Choose the Right Camera Settings for Video Production.
Thus, if you’re recording at 24 frames per second (fps), you should set the shutter speed to 48 fps or the closest to it (often 50 fps).
And if you’re recording at a frame rate of 60 fps, you should set the shutterspeed to approximately 120 fps.
There’s a big difference in how much motion blur you’ll get with a shutter speed of 48 fps compared to a shutter speed of 120 fps.
While shooting at 24 fps with a shutter speed of 48 fps is the preferred look in most Hollywood movies, 48 fps can results in a lot of motion blur if your subject is moving around and you want to grab a still photo.
This can be cool if that’s the look you’re going for. But if you want film your kids playing in the garden or your dog running around, and then try to grap a nice sharp image from that, you’ll want the highest frame rate and shutter speed possible.
You might need to choose between resolution and frame rate
Depending on the camera you have, you might need to pick between resolution and frame rate. Being able to shoot in 4K at 60 fps does come at a price.
That being said, it’s available in a lot of camcorders and hybrid cameras such as the GH5 or GH5S which doesn’t cost a fortune anymore.
But if your camera only lets you record 4K at e.g. 30fps but 1080p (FullHD) at 60 fps then you need to decide what’s most important to you: resolution or motion blur.
It also depends and your scene and your subject. But if your subject is fairly still, I would always go with the higher resolution myself, if I wanted to grap a picture from the motion recording later.
Method 2: use the frame grab feature on you camera to take a photo while recording video
Some higher-end cameras allow you to take a photo while recording video at the same time. As to exactly what is possible depends on your camera. And often there are several settings to choose from.
Simultaneously take a picture while recording
For example, the Nikon flagship camera the Nikon D5 has a feature called “Live Frame Grab”, that allows you to simultaneously capture an image while recording video at the same time.
When you press the shutter release button while recording video, you can take pictures without any interruption.
Another option is to use the feature “save selected frame” directly in-camera, to create jpegs from your video recordings.
The photos will be captured at the resolution, you’re recording in. So if you’re recording in 4K, you’ll get an 8 MP photo at the same time.
Take a picture while shooting while interrupting the video for a short while

A lot of cameras – whether hybrids like the GH5 or digital camcorders – will let you take a photo while you’re shooting video, but it will interrupt the video while you do so and result in a few black frames in your video recording. Also, no sound will be recorded while you do so.
Still, this is an excellent feature to have, especially if you’re a news reporter or your often film events (or your kids’ birthday party), and you want to capture a still for later.
Most cameras only let you capture a frame at the same resolution as your video.
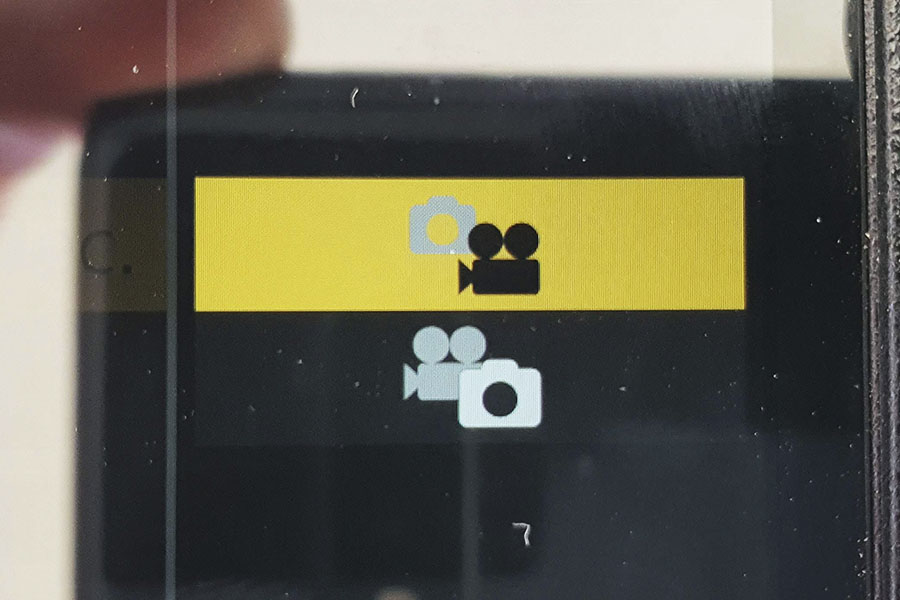
But if you’re using a camera like the Panasonic GH5, you can also shoot in “Photo Priority”, which is a mode that lets you take photos with the set picture size and quality you prefer.
A quick note on using continuous shooting like burst modes for video

Another option is to use continuous shooting. Continuous shooting is when your camera takes multiple pictures at a time. A lot of cameras have different burst modes e.g. bracketing, that’ll let you take a series of photos quickly after another.
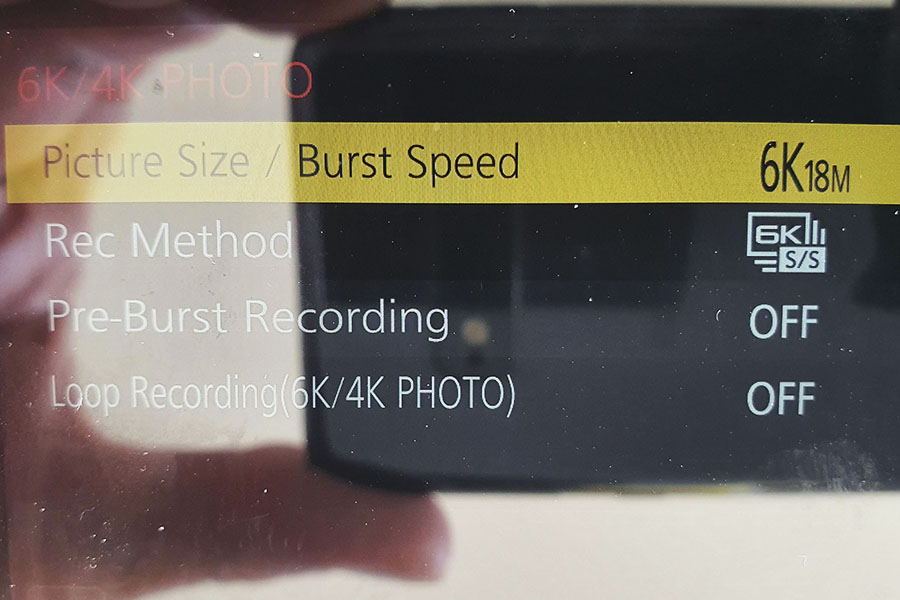
On a camera like the GH5, you’ll find an extension of this, that will let you record an unlimited number of still photos in 6K or 4K. And you can even record audio at the same time. However, this is only available in 8-bit color.
In 6K you can shoot up to 30 fps and save the desired 18 MP pictures from the recorded burst file. The burst file itself is saved as an MP4 file that can be played back as a video file as well.
In 4K you can shoot up to 60 fps, and grab the 8 MP pixel you desire.
This is one of the advantages of shooting with a hybrid camera that is equally a stills camera and a video camera at the same time.
Summary
You can grab a stills frame from any video using video editing software.
In order to get the best result, shoot with as high a resolution, frame rate, and shutter speed as the camera lets you do.
If your camera lets you record video in e.g. 6K, but with a maximum of e.g. 24 fps, you can use this setting if you don’t have a moving subject.
If your subject is moving a lot, it might be better to scale down the resolution a bit to maybe 2K or FullHD to shoot with a higher shutter speed to reduce motion blur. But know, that you won’t be able to scale up that photo without it becoming grainy.
If you need to shoot in FullHD, you can try with the tools that upscale your photos while trying to preserve the detail at the same time, but these tools are often more a miss than a hit. So it’s not something I would recommend you depend on.
Some cameras have different features that’ll let you grab a frame from a video file in-camera as well. Most will let you do frame grabs that mirrors the resolution and shutter speed of your video recording.
Some video cameras will let you take a photo while recording a video. The Nikon D5 will let you do this without interrupting the video recording.
And a camera like the Panasonic GH5 has different modes available that’ll let you take photos while recording video (but at the cost of a few black frames and no sound in your video while you do it).
The GH5 will also let you shoot up to 6K photos in continuous mode (with sound) that can also be played back as a video file. However, only in 8-bit color.
In other words, there’re lots of ways you can capture a photo while recording video at the same time. You just need to know the limits and possibilities of your camera.
I hope you found this article useful? Feel free to comment and share it. And now go shoot some awesome video and photos.

