The Roto Brush tool in After Effects is essential when you want to place something – fx text or a 3D object – between an actor in the foreground and the rest of the post-production scene. And since Roto Brush v2, it’s never been easier.
This 11-step tutorial explains all the basic steps you need to know to separate a subject or object from the background in your video.
Below is an easy-to-follow step-by-step guide to using the roto brush tool, including some best practices for getting the best results.
Table of Contents
1. Duplicate the layer you want to roto. Rename the new layer roto.
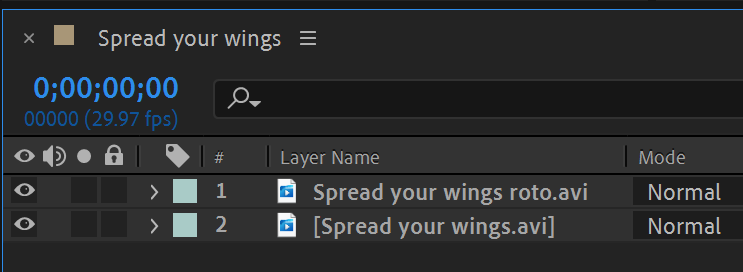
After you’ve imported the footage that needs rotoscoping into your composition, start by duplicating the layer (Ctrl/Cmd + D).
Rename (Enter) the new layer and add the word roto.
2. Double-click on the new layer to open the Layer Panel.

The roto brush tool only works in the layer panel, not the composition panel. So double-click on the new roto layer you’ve created in the timeline to open the Layer Panel.
3. Select a frame where you can see the whole subject

Find a good frame to start rotoscoping where other things in the scene do not hide parts of your subject. This will make tracking your subject much easier for the roto brush tool.
The frame you select will become your first base frame.
4. Select the Roto Brush tool in the toolbar.

Go to the roto brush in the toolbar or use the shortcut Alt/Option + W.
5. Resize your brush to an appropriate size

Change the brush size by simultaneously holding down Ctrl/Cmd while dragging the mouse left (or down) or right (or up).
Choose an appropriate brush size that matches the subject/object you want to roto.
6. Paint green strokes across the subject/object you want to roto
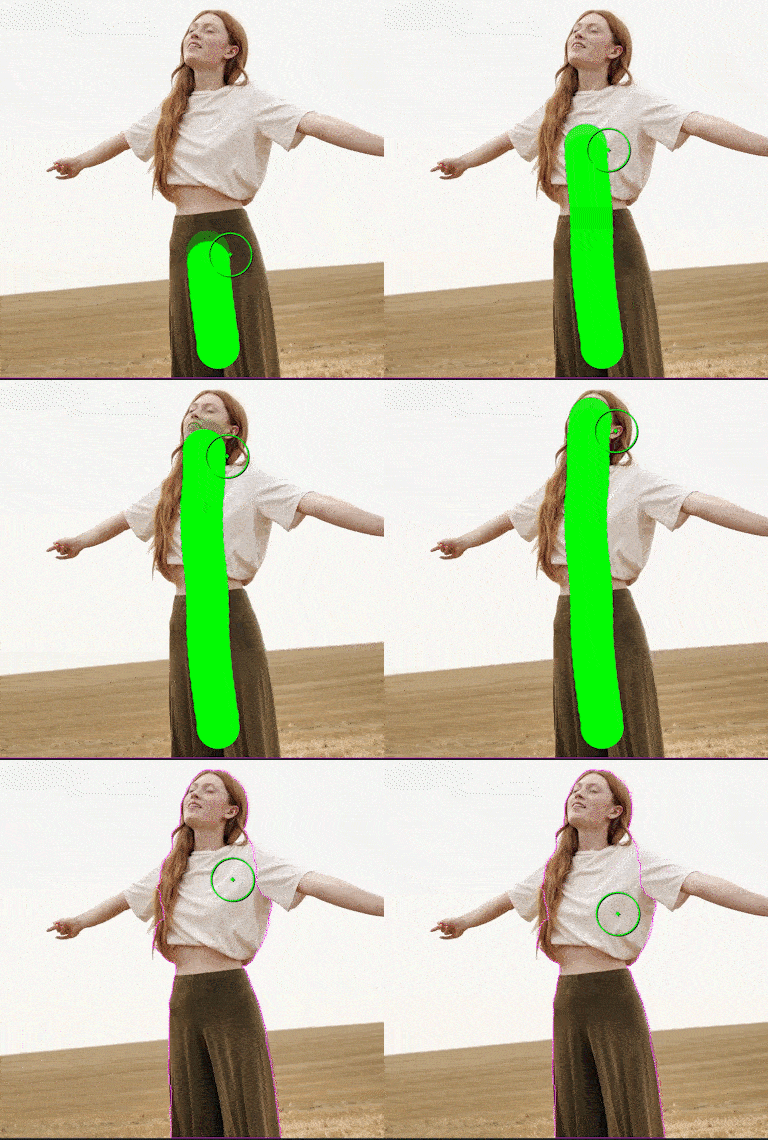
Start by drawing a single stroke across the subject you want to roto. Draw a stroke by holding down the (left) mouse button and dragging the mouse across the area you want to select.
Then, add more strokes until the whole subject is selected.
Resize the brush as necessary to fit the parts of your subject/object.
Best practices:
- Draw as few strokes as possible for the best results.
- Don’t draw across the edge of your subject (keep the strokes inside the borders of your subject/object).
- Drawing a stroke for each major body part is sometimes useful when rotoscoping a person. Think of it as drawing a stick figure skeleton on top of your subject.
In difficult cases (fx low contrast footage, footage with similar colors between the subject and the background, or footage with a lot of movement), you might even need to create several roto layers – one for each limb.
Remember to resize the stroke to fit each part. For example, you might use a broad stroke for the torso and head, a medium-sized stroke for the arms and legs, and a thin stroke for the fingers.
7. Delete unwanted selections with red Background Strokes

If the roto brush accidentally selects areas you don’t want, you can erase these with background strokes.
To paint background strokes, hold down Alt/Option and drag over the area you want to deselect while holding down the (left) mouse button.
Best practices:
- If you accidentally make a wrong stroke, it’s best to undo it by pressing Ctrl/Cmd + Z.
- However, if the roto brush includes areas from the background, it’s best to erase them by painting over them using the red background strokes.
8. Press the spacebar to start tracking the roto matte selection

Press the spacebar to let the computer calculate the propagation of the matte you’ve selected with the roto brush.
If you want to go frame-by-frame instead, press Pg Up or Pg Dn.
9. Correct lost or unwanted regions
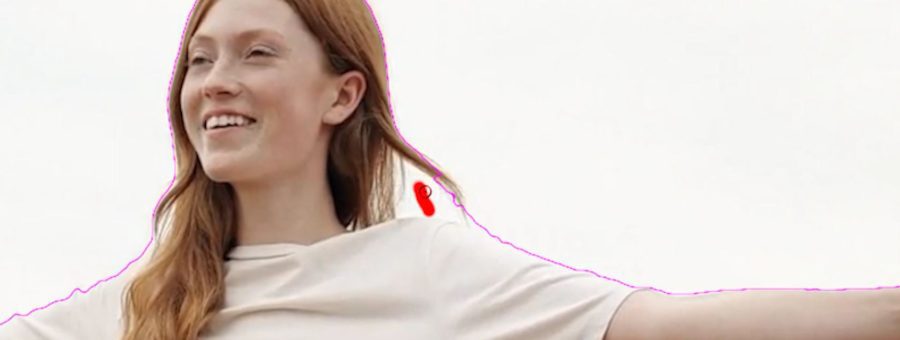
As the roto brush tracks your selected matte, it might start to include or exclude regions of the image you don’t want.
To correct this, go to the first frame you notice an error and paint a green/red stroke over the area you want to add or remove.
10. Refine the edges of your selection with the Refine Edge Tool
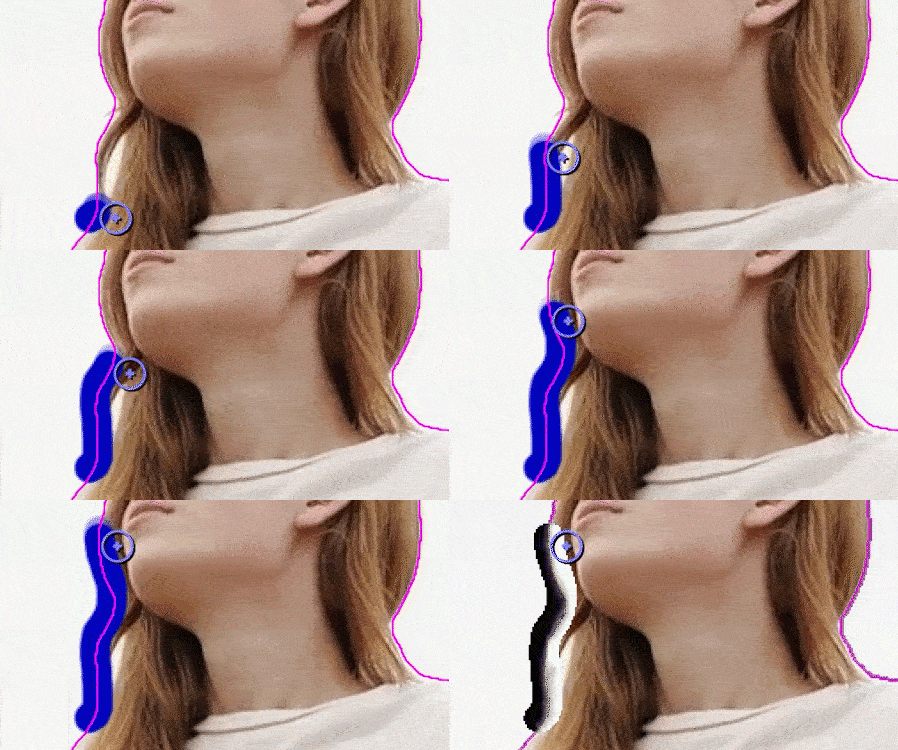
Now it’s time to fine-tune the edges of your subject with the Refine Edge Tool.
The Refine Edge Tool is handy when you want to roto something like hair or fur.
To select the Refine Edge Tool, either:
- Use the shortcut Alt/Option + W (pressing it multiple times toggles between the roto brush and the refine edge tool)
- Long press on the toolbar’s roto brush icon so the refine edge tool opens up; then select it.
10. Preview your Roto Brush selection
You can preview your roto brush selection in different ways using the layer panel view options below:

You can toggle on and off each view mode by clicking the above buttons.
You can also change the color and opacity of the different views using the colored square to the right in the image above. You can also change the opacity using the percentage dial—100% is the default.
The four way view options (from left to right) are:
Refine Edge X-Ray (shortcut: Alt+X / Option+X)
The Refine Edge X-Ray lets you view your refined edge selection as a black-and-white alpha.
Alpha (shortcut: Alt+4 / Option+4)
The Alpha button lets you view your selection as a white on black alpha
Alpha Overlay (shortcut: Alt+6 / Option+6)
The Alpha Overlay lets you view your selection on a background overlaid with a solid color you can choose.
Alpha Boundary (shortcut: Alt+5 / Option+5)
The Alpha Boundary shows a colored boundary as an outline around your selection.
Below, you can see what the view options look like. The first image is with none of the view options turned on.

11. Freeze the roto matte propagation

When you’re satisfied with the roto brush matte, click the Freeze button.
When you freeze the matte, the freeze button turns blue, and the bars in the span view turn purple.
Freezing the propagation caches and locks the matte in place so that After Effects does not re-propagate the edges.
Freezing your matte frees up processing power and allows you to make further adjustments to the matte using the parameters in the effects panel much faster.
Summing Up
The Roto Brush tool in Adobe After Effects is extremely powerful when you want to separate an object or subject from the background in your video. And since Roto Brush v2, it’s never been easier.
In part 2, we’ll explore the more advanced settings for tweaking the roto brush and examine how you can take advantage of some of the legacy features from roto v1 that are still hidden in AE.
Up Next: How To Roto Brush In After Effects. Part 2: Advanced Settings (Illustrated Guide)
FAQ:
How to make a new base frame for the Roto Brush
Draw on a frame outside the current span to create a new base frame with the Roto Brush.
If you want to create a new base frame within a current Roto Brush span, trim the current span to be shorter, not to encompass your current frame.
How to change the length of a span when using Roto Brush
To change the length of a roto span, grab the start or endpoint with the mouse and drag to change the length.
How do you adjust the Roto Brush Size?
You adjust the Roto Brush size by holding the ctrl (PC)/cmd ⌘-key (Mac) + dragging the mouse up or down while pressing the left mouse button.


