Exporting is the final step of your editing process. How much data your export will need to encode depends on where you decide to publish the video.
But how can you export a high-quality video that doesn’t eat up your hard drive?
To export a high-quality video with a low file size, there are three settings you can tweak: the codec, number of passes, and bitrate. If you’re in a hurry, here’s a cheat sheet with some recommended settings for a 1080p H.264 video using only the Bitrate settings tabs:
| Platform | Resolution | Codec | Bitrate Encoding | Passes | Bitrate |
|---|---|---|---|---|---|
| YouTube | 1080p (FullHD) | H.264 | VBR | 1 pass | 16 MBPS |
| YouTube | 4K (UHD) | H.264 | VBR | 1 pass | 35-45 MBPS |
| 1080p (FullHD) | H.264 | VBR | 1 pass | 12 MBPS | |
| 4K (UHD) | H.264 | VBR | 1 pass | 40 MBPS | |
| Vimeo | 1080p (FullHD) | H.264 | VBR | 1 pass | 16 MBPS |
| Vimeo | 4K (UHD) | H.264 | VBR | 1 pass | 30-60 MBPS |
If you want to see the best settings to ensure the best quality video at low file sizes, I recommend you keep reading.
This illustrated guide will show which basic video settings affect your videos the most during the Adobe Premiere Pro CC export process.
After reading this quick tutorial, you’ll understand how to choose the right video codec, the best format, and bitrates, to ensure better quality in your finished video project without huge file sizes.
Let’s jump into it:
Choosing Your File Format

With your timeline selected, pull up the exporting screen by either hitting FILE > EXPORT > MEDIA or by using the keyboard shortcuts CMD+M (Mac) or CTRL+M (Windows).
Check out our guide to Premiere Pro shortcuts [PC/Mac].
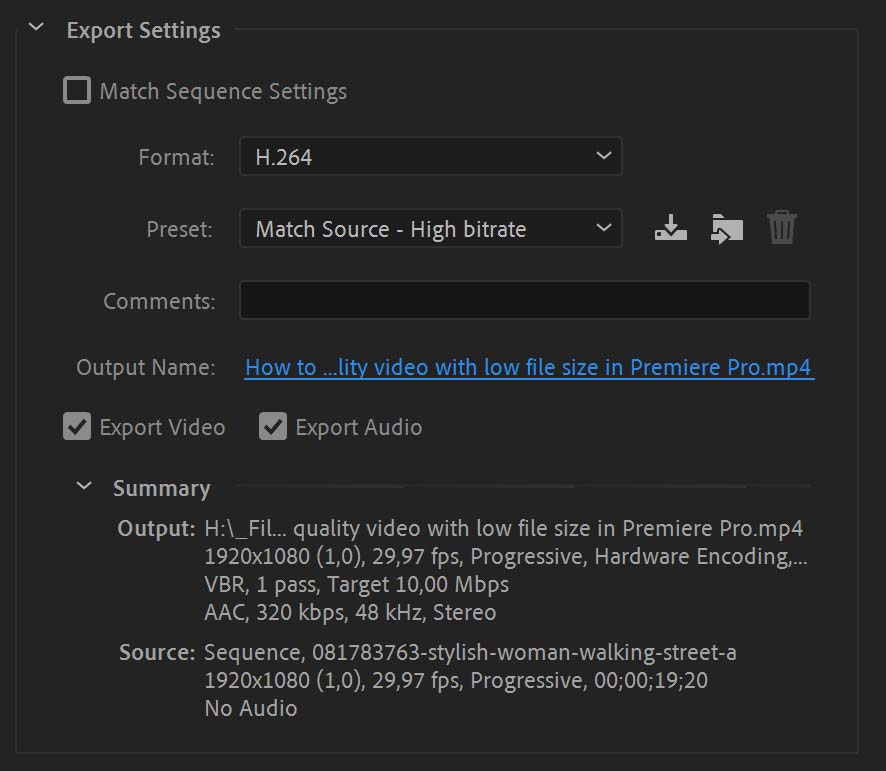
Above the “Format” tab, you will notice a checkbox for “Match Sequence Settings.” This setting will encode your exported video with the same settings as the timeline.

We want more control over our final settings, so we will not use this function. Instead, the settings on the “Format” and “Bitrate Settings” tabs will be tweaked.
Note that the Bitrate Settings isn’t the same as the Preset that says, “Match Source – High Bitrate,” but the one you see further down under the video tab. I’ll get back to this in a minute.
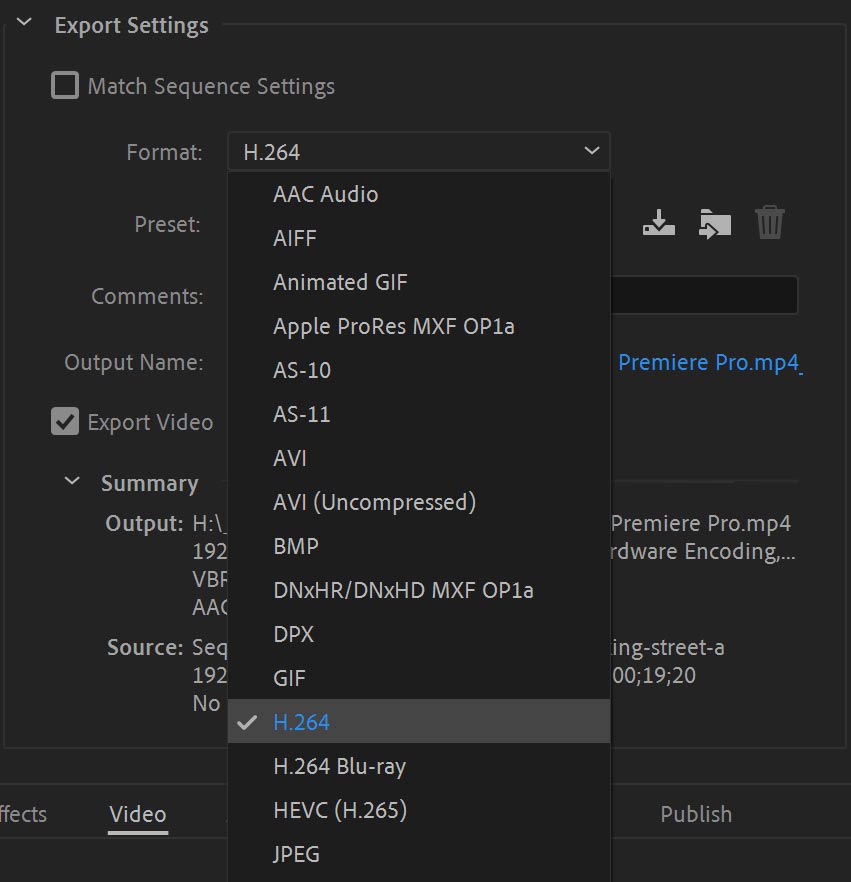
You will then need to decide which file format to render in. The most common format for online video is H.264.
The H.264 video format is used for online video because it’s widely compatible across many devices. The small file sizes make the codec easily playable across different bandwidth speeds.
We will use H.264 standard codec for our example because of its ability to create high-quality video files with low file sizes.

Notice that there’s also the H.265 codec (HEVC), which is even more efficient at creating a small file size video in good quality. The problem is that it’s still relatively new, and many media players don’t support it.
Bitrate Settings Tab
Now let’s adjust some settings. One major problem with low file sizes on video tends to be “artifacting.” This is when there will be a lot of large visible pixels on the video.
The fastest way to adjust how much data is in your file is to head down to the bitrate settings.

This is where you can do the rest of the work.
Bitrate Encoding
There are three different settings in the “Bitrate Encoding” drop-down menu: CBR (Constant Bitrate), VBR 1 pass (Variable Bit rate), and VBR 2 pass.

Let’s make the differences between all of these very simple. Constant bitrate will encode at whatever bitrate you tell Premiere.
For example, if the bitrate is set to 10 MBPS (Megabits Per Second), Premiere will encode at only that rate.
Lower data rates create a lower quality image but smaller file sizes. High data rates create fewer artifacts but a large video file size.
Variable bitrate means the encoding will change depending on what is happening in your video.
For example, if you have a lot of motion in some sequences, Premiere will encode more data to avoid artifacts.
1 pass means Premiere will pass through the video one time while also encoding.
2 pass means Premiere will determine how much data is needed and then proceed to encode during a second pass. 2 pass will give you the highest quality video file, but 1 pass will give you a smaller file size.
However, 2 pass will increase the render time.
Ensure you haven’t checked the “Render at Maximum Depth” and “Maximum Render Quality” boxes.
Those will render the footage at the maximum bit depth supported by the format or settings regardless of the bit depth of the source footage, meaning you’d end up with a larger file size.
Notice also that (changing) the frame rate doesn’t affect the final file size when you export video.
However, a 60 fps video at 16 Mbps will have a lower image quality than 24 fps at the same bitrate. That’s because there are less data available for each frame.
Target Bitrate
Target bitrate is used to determine an estimated file size for the final exported video. The amount of data encoded will depend on what’s happening in your video.

Which pass setting should you use? How much data should you aim for?
That depends. If you have a talking-head video, you will be okay using the CBR function and keeping it between 10-15 MBPS.
However, if you have a full-on car chase, you should aim for the VBR 2 pass with a range between 20-30 MBPS.
YouTube recommends rendering videos with at least 8 MBPS. However, I’ve had better video files with 10-15 MBPS encoding.
Once completed, a 10-minute video may put you in the 250-300MB file size.
I generally don’t recommend under 10MBPS, but I’ve been able to get away with it in a few cases.
Facebook and Vimeo have similar bitrates as YouTube.
Facebook doesn’t have a recommended target bitrate, but 10-12 MBPS should be fine.
Vimeo recommends 10-20 MBPS for a 1080p video.
4K Video settings

It’s a great idea to upload your content as 4K (even if you shot in 1080) if you regularly post to any of the platforms we have discussed in this tutorial.
The reason is that it will “future-proof” your content when 4K becomes to inevitable standard.
Also, uploading in 4K has, for a long time, been the only way to make sure that YouTube chose the better VP09 codec over the old AVC1.
However, YouTube can now play with the even better AV1 for some videos if you set it up manually. You can read more on how to get the best possible image quality and codec on YouTube here.
Premiere has 4K presets for all these platforms, so this method will be the simplest way to export in 4K.
However, you can follow similar steps in this article if you want something more custom.
The first step is ensuring the video is in the 4K 16:9 aspect ratio. This equates to 3840 x 2160 pixels.
You can change this manually under the “Basic Video Settings” tab near the top of the export window in Premiere.
The next step would be to follow the same procedure previously mentioned, deciding on the pass settings and bitrate.
4K video needs many more pixels than a 1080 p video, so I recommend using the VBR, 1 pass settings.
For bitrate, YouTube recommends 35-45 Mbps. Vimeo recommends 30-60 Mbps.
Facebook does not have a recommended setting. I have used a setting of 40 MBPS across multiple types of projects with no issues in my experience.
Presets For YouTube, Facebook, And Vimeo

Under the “Format” tab is a tab labeled “Preset.” Adobe Premiere Pro comes loaded with many encoding presets ready for several platforms where you may want to publish your video.
Most notable are presets for all the platforms we discussed: Facebook, Vimeo, and YouTube videos.
These settings are great if you’re in a hurry and don’t want to adjust anything yourself.
However, if the file sizes are too large in your final export, you can always adjust the bitrate settings for the best results. I use the YouTube preset daily for my projects. The video file is always high quality and usually plays across any platform.
Conclusion
When doing video exports, it’s best to try a few different bitrates to see what works best for you. However, this tutorial should give you a good idea of keeping your bitrates low without sacrificing video quality.


Thank you. It has been very useful.
This was detailed yet to the point. Thanks!