MOGRT files are pre-made motion graphic templates. They are an easy way to add motion graphics to your video projects without the hassle of creating keyframes every time you need to create a new graphic.
While Adobe Premiere has some MOGRT included, you’ll often find that you need something entirely else.
In that case, you can either purchase one that fits your needs – or make a MORGT yourself.
Free and paid MOGRT files can be found on websites like Storyblocks, Envato, or Motion Array, but you can also create your own using Premiere Pro or After Effects.
After Effects is a more efficient method of creating MOGRT files, but you can also use Premiere if you don’t have After Effects.
See here how to import and edit MORGT files here.
This article is an easy tutorial on creating MOGRT files in 6 steps using Premiere Pro.
First, let’s learn why we want to create a MOGRT file.
Benefits of MOGRT Files
There are several great benefits to using MOGRT files on your video projects.
The first and most obvious is that it will speed up your workflow. MOGRT files allow you to save the motion graphic as a template that will appear like a piece of media. This is helpful if you use the same motion graphics frequently.
The second benefit is that you can sell MOGRT files you create. MOGRT files are created in the .mogrt format, which allows them to be easily saved and installed on another computer.
You can learn more about importing MOGRT files in this article here.
Websites like Storyblocks, Envato, and Motion Array sell MOGRT files created by other content creators.
You could sell the files on one of these platforms or your website as a downloadable file. This is a great way to generate income from files you are already using.
Now we will create a basic MOGRT file that can be saved to Premiere in 6 easy steps:
Step 1: Decide what motion graphic elements to use

First, we must decide what elements to use for the motion graphic.
We will keep this tutorial simple by creating a line of text that enters the frame from the left, stop in the middle for a few seconds, and then exit the frame to the right.
You can read more about how to add and edit text in Premiere Pro here.
Step 2: Create the text layer
Next, we’re going to create a new text layer. You can do this by hitting the keyboard shortcut (Mac: CMND+T) or (WINDOWS: CONTROL+T).
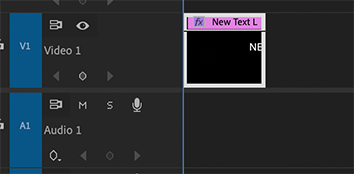
Type in the text you want. For this example, I will use my name, “Alex Srednoselac” as the line of text.
Step 3: Change the text properties
Now we will change the properties of the text layer.
I like to use Helvetica as my font choice for most projects so I will use it here. Last, I will change the size of the text to 150.
This size is large enough that my full name will still fit within the Safe Zone guidelines.

Step 4: Centering the graphic
Next, we will center the text horizontally and vertically.
I recommend doing this any time you create an asset, as it is easier to move or undo the positioning later than to center the graphic. This will also keep your graphic centered if you change the scaling.
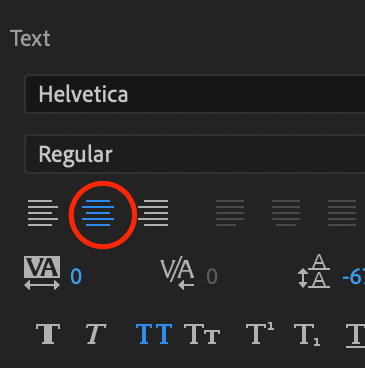
To start, we will center the text line using the paragraph center button in the Text tab.
You can see this button circled in red in the photo below.
This will center the anchor point of the text, which will prevent you from having to re-center if you make sizing adjustments later.
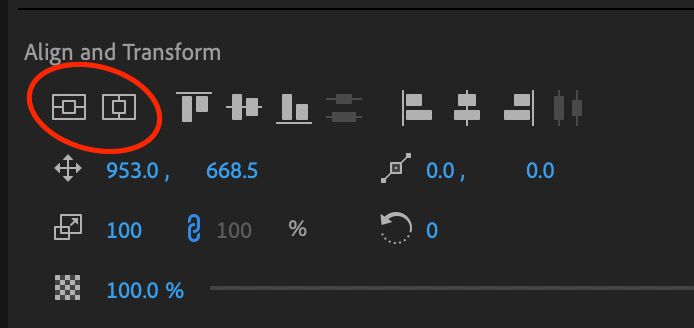
Click on the vertical and horizontal align buttons under the Align and Transform tab. Both are circled in red in the photo below.
This will perfectly center the graphic on the horizontal and vertical axis.
Note that you can use this option to center the graphic again after changing the positioning.
Step 5: Adding motion
Next, let’s add motion to this graphic. The default duration for a graphic in Premiere is 5 seconds. You can change the duration to any length, but we will keep it at 5 seconds for this tutorial.
First, we will add a position keyframe near the beginning and end of the graphic.
This will lock our graphic into place for a few seconds before and after the graphic enters and exits the screen.
I want the graphic to hold still for 3 seconds so that we will add a keyframe at 1 and 4 seconds.
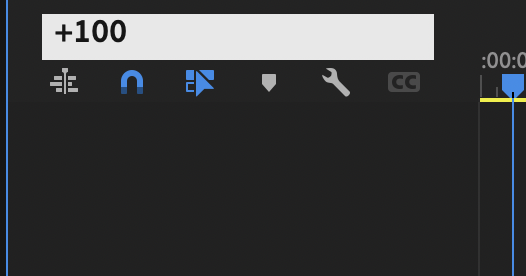
You can quickly move the Playhead to 1 second by typing “+100” on the Playhead Position box pictured below.
Next, move to the Effects Control tab in the Source Panel. Place a keyframe using the clock icon next to Position.
Once the keyframe is set, you will see a small diamond shape to the right of the Effects Control Panel.

You can then type “+300” on the Playhead Position to move the Playhead to the 4-second position. Place another keyframe by hitting the diamond icon (pictured below) on the Position tab.
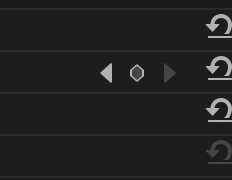
Now the graphic will not move for 3 seconds.
Let’s add the enter and exit motion.
First, place the Playhead at the beginning of the clip by hitting the up arrow on your keyboard.
In the Effects Controls tab, drag the X position to the left until the graphic disappears off-screen. Since we hit the clock icon earlier, this will automatically create a keyframe for this position.
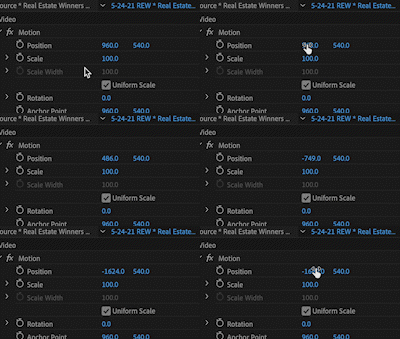
Perform the same task on the last frame of the graphic. Hit the down arrow on your keyboard to move the Playhead to the last frame.
In the Effects Controls tab, drag the X position to the right until the graphic disappears off-screen.
Premiere will automatically add another keyframe for this movement. The motion graphic is now complete.
You might like this illustrated guide on How to use the Essential Graphics panel in Premiere Pro.
Step 6: Save the graphic as a MOGRT file.
The last step is to save our new motion graphic as a MOGRT file. Right-click the text layer on the timeline and click “Export As Motion Graphic Template….”
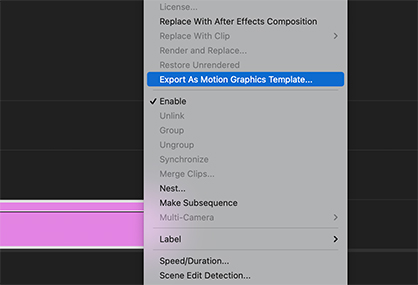
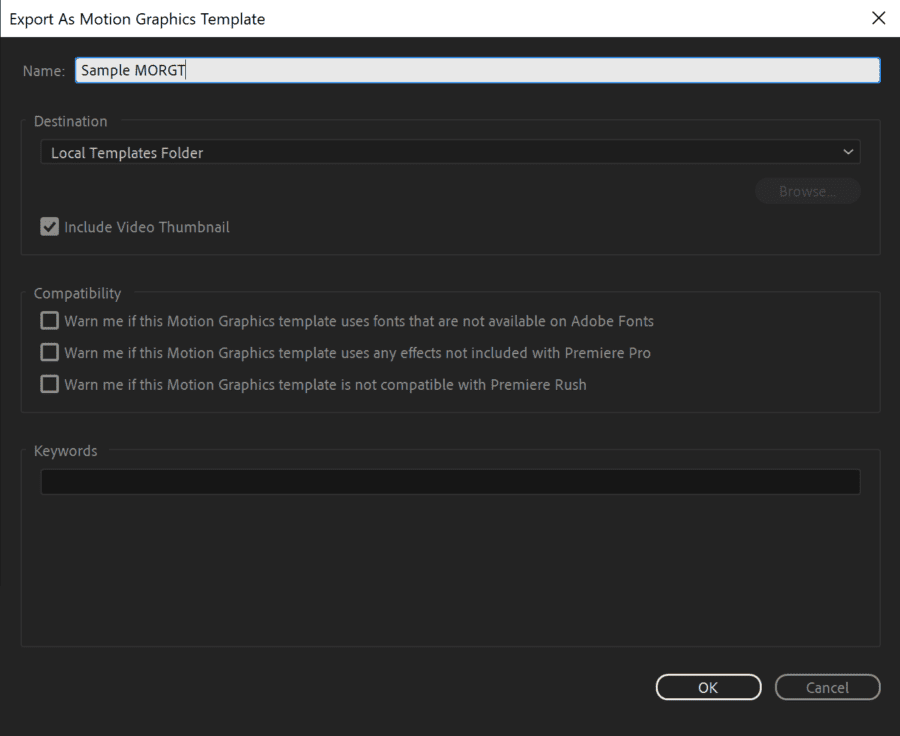
A window will appear where you can name the MOGRT file, change the file destination, etc.
For simplicity, keep the file Destination in the Local Templates Folder. This is where all pre-installed MOGRT files are stored and will make it easier to find later.
You can change this if you are a more advanced user.
You can find the MOGRT file in the Essential Graphics Panel. Hit Window > Workspaces > Graphics to view the Essential Graphics Panel.
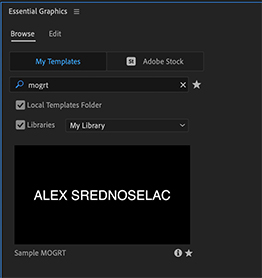
Your graphic should appear with the other pre-installed MOGRT files, but you can also search for it if you cannot find its location.
You might like How to add subtitles and closed captions in Premiere Pro.
Conclusion
This tutorial is a simple explanation of how to create a MOGRT file. You can add other motions, backgrounds, and more to these files, but it’s important to learn the basics first.
MOGRT files are a great way to simplify your motion graphics workflow inside Premiere.
If you got any questions, let us know in the comments below.


Hi! iam extremely new to Video editing. I have a mogrt file created in After effects and i am unable to open it in Premiere rush. I was told the only way i can open it is if the mogrt file is created it premiere pro. So is there a way to import the file in Pro and export it again?? I hope i have made my question clear. thank you
Hi Aisha
Sure, but it’s a bit of a workaround.
First, follow the steps 8 + 9 in this article: https://filmdaft.com/how-to-create-a-mogrt-file-in-adobe-after-effects-illustrated-guide/ This will export the .mogrt file from After Effects, so you can open it in Premiere Pro.
Now, you need to import it to Premiere Pro as described in this guide: https://filmdaft.com/how-to-import-and-edit-motion-graphics-templates-morgt-in-premiere-pro/
And, finally, then you need to export/save it from Premiere Pro, as described in point 6 in this guide, you reading right now: https://filmdaft.com/how-to-create-a-mogrt-file-in-premiere-pro-illustrated-guide/
It’s a bit of a long way, so you might be better off with finding a mogrt-file that’s already made for Premiere Pro/Rush that looks similar to what you want. Rush has a bunch of templates built in already. And you can find more here: https://filmdaft.com/best-places-to-find-motion-graphic-templates-mogrt-files-free-and-paid-year/
I hope this helps?
Best, Jan
FilmDaft founder
Hi Jan,
I have tried this workaround, but If I install the mogrt, put it on the timeline, right click on it, then I can’t choose the option ‘export as motion graphics template. It’s grayed out.
Am I doing something wrong?