Sometimes you want your film or YouTube vlog to have black bars over and under your video to give your video a certain cinematic look and feel.
The black bars frame your footage within a specific aspect ratio and remind people of watching Hollywood-movies in a Theater or on the flatscreen at home.
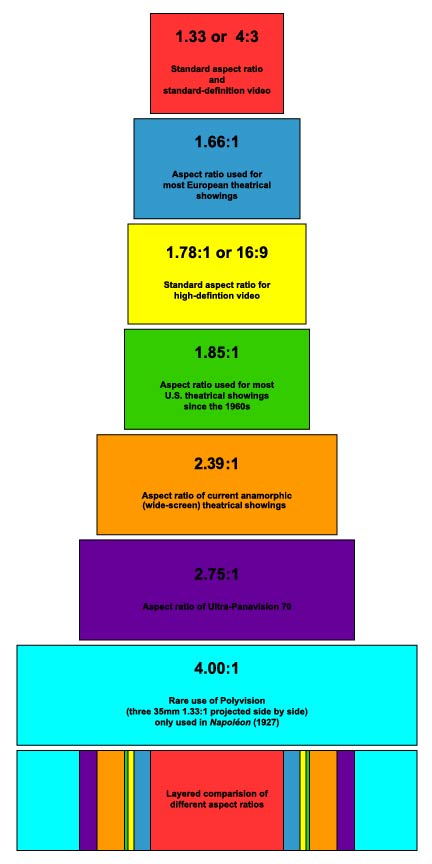
Maybe you want to give it a widescreen look like 2.35:1, 2.39:1, or 2.4:1 which is the current widescreen standard for movies in cinema theaters.
Or I could be, that you want to create a retro look with a 4:3 reminiscent of the old CRT television screens.
Whatever the case may be, there’s the right way to get those black bars showing up on your viewers’ screens and there’s the wrong way.
But that doesn’t mean that the “wrong” way can sometimes be useful or even necessary. I’ll get to that in a second.
At the end of the post, I’ll post a link to some free black bar templates you can download and use in your projects.
Cinematic Aspect Ratios
To get a quick overview, here are some of the most common film aspect ratios:

First, let me get this out the way: there’s no such thing as a “cinematic” aspect ratio. What makes a movie or video is what happens within the frame, not the frame around the frame.
That being said, there are certain aspect ratios people associate with Hollywood movies.
It’s when blockbusters move out of the movie theatres and into the television screens and home theatres those black bars start to appear.
Because viewers associate these black bars around Hollywood movies with movie theatres, you can steal some of that Hollywood mojo by framing your footage within black bars.
Here’s a table of some common aspect ratios, their resolutions in pixels, and their names:
| Pixels | Aspect Ratio | Names |
|---|---|---|
| 1280×720 | 16:9 | HD, High Definition |
| 1920×803 | 2.39:1 | HD CinemaScope cropped |
| 1920×817 | 2.35:1 | HD CinemaScope |
| 1920×1080 | 16:9 | Full HD, FHD, HD, High Definition, 1080p |
| 1920×1200 | 16:10 | WUXGA |
| 2048×871 | 2.35:1 | 2K CinemaScope |
| 2048×1080 | 1.90:1 | 2K DCI native |
| 2048×858 | 2.39:1 | 2K DCI CinemaScope cropped |
| 3840×1634 | 2.35:1 | 2K DCI CinemaScope |
| 3840×2160 | 16:9 | 4K |
| 4096×1716 | 2.39:1 | 4K DCI CinemaScope cropped |
| 4096×2160 | 1.89:1 | 4K Cinema |
| 4800×2700 | 16:9 | 5K UHD |
| 5568×3132 | 16:9 | 6K UHD |
| 7680×4320 | 16:9 | 8 UHD |
Cinematic Black Bars Done Right
There are two right ways to get black bars around your footage:
- Shoot with the aspect ratio for your final delivery from start
- Reframe your footage in editing/post-production
What you essentially want is to let the viewers’ media player (whether that be YouTube, Vimeo, or something installed locally on the computer like VLC) automatically create the black bars for you as a result of the aspect ratio of your video.
Modern media players are able to determine the aspect ratio automatically and will create black bars if the aspect ratio of the footage is different from that of the screen.
In most circumstances, the black bars will only appear, when there’s a difference between those two aspect ratios when the video is viewed as full-screen.
The reason you want to do it this way is that the bars will appear truly black because they create independently from the video itself.
Cinematic Black Bars Done “Wrong”
If you manually put black bars on your footage using some kind of graphics template, the graphics will be a burned-in part of the video footage and thus susceptible to the artifacts of codec compression from the codec you use for export to something like YouTube-compression.
In other words, you’ll end up with a video with some noisy black bars around it with visible digital artifacts.
However, that doesn’t mean you cinematic black bar templates aren’t useful.
- Cinematic black bar templates offer a quick way to quickly get a sense of how your footage will look reframed to different aspect ratios.
- Sometimes a client wants the video with black bars surrounding the footage so that you can use the black space for captions, subtitles, logos, and more.
I’ve found cinematic black bar templates useful if I had to quickly need to check my footage for delivery in several formats, e.g. when I produce a video for a client that needs a video in different aspect ratios for different social media platforms.
And sometimes, I end up using the black areas for additional information surrounding the video.
Conclusion
Unless you need cinematic black bars as a way of framing additional content related to the video or quickly checking how your footage appear in different aspect ratios, you should always export your video in the preferred aspect ratio of choice and let the video player handle adapting your video to the screen and put on black bars.
If you want to download some free cinematic bars, I’ve created this package for 1080p and 4K widescreen (16:9) footage:
Cinematic Black Bars Templates Free Download
You simply shoot in 16:9 widescreen (1920×1080 or 3840×2160) and put the graphic template of choice on a layer on top of your footage.
Feel free to use them for whatever project you want – even commercially.
I hope you found this article useful? If you got any questions just post them in the comments below.

