Photos and illustrations by Otis Ryder
One of the trickiest things that you may find when shooting real estate video or taking photos of a home is a pesky mirror that is found in that small bathroom or randomly down a hallway.
You can’t get around the decorative pieces. But facing you down in that mirror is a photographer/videographer you don’t want to end up in the final video or photo.
So how do you manage to stay out of the final product?
In this article, I’ll go over a few different techniques you can use to ensure that your shots are clean, professional, and, most importantly, lacking your physical self.
For photography, there are two solutions, angle change and or post-production work.
For videography at the standard price that realtors are willing to pay for media, you only have one option, and that is a change of angle. So, we will start there.
Tip: If you’re planning on starting a real estate videography business, I recommend you read my article How To Shoot Real-Estate Videos. A Beginners’ Guide.
1. Change the angle
A vast majority of the time a simple change of perspective on the subject/room you are shooting is all you need to remove yourself from a photo.
Don’t be afraid; you just need a little perspective. Take the camera off the tripod/gear and get your eye into the viewfinder. Move the camera around to find an angle that is representative of the space and doesn’t have you in the shot.
If the camera cannot be hidden always shoot with the camera on the edge of the frame as much as possible. This will make your work a lot easier in post-production which I’ll get back to further down the article.
Try to angle the shot so that whatever is shown as the camera’s background is a constant as possible with a single color or shade.
For video, you want to do the same. You may find that shooting with the door frame in the shot is an excellent way of hiding the camera and gives the space a much more realistic perspective by introducing a scale of the door frame in your shot.
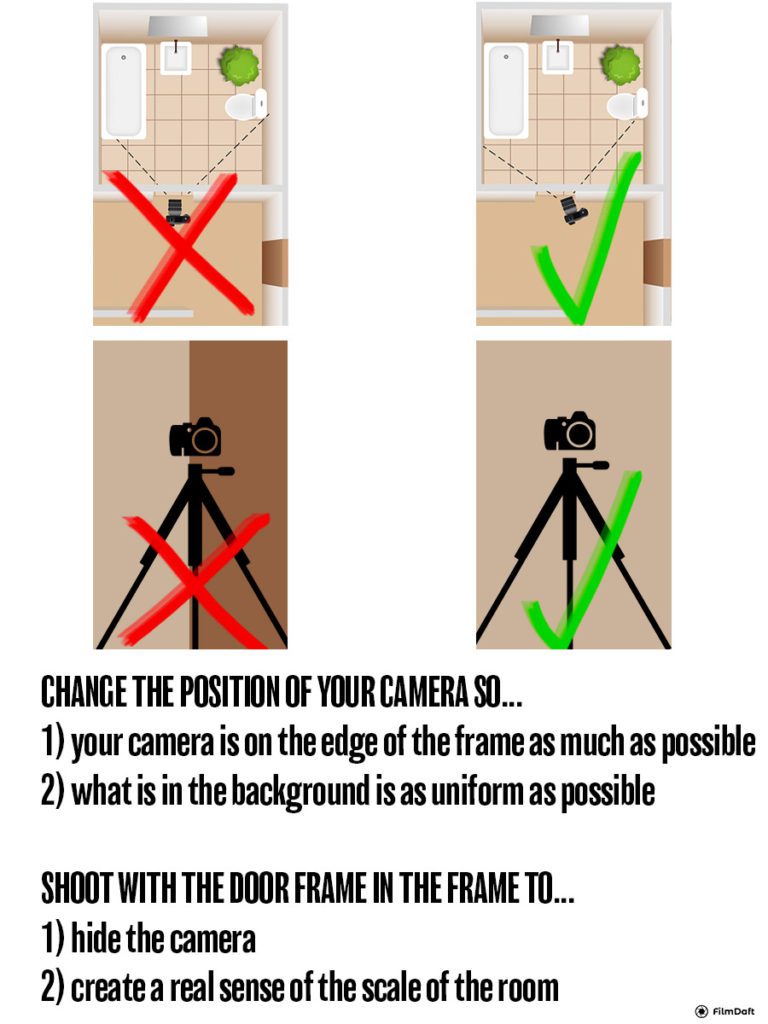
This is your only real option with video as it is not time effective nor cost-effective to take out a camera appearing in the reflection of the mirror with a shot that has movement.
You also can give yourself a little bit of time by making the shot slow motion.
Outside of that, be a professional and advise against shooting an area that is ultra-tight as if it cannot be done right, it shouldn’t be done at all.
2. Photos & Post-Production
If you cannot change the angle of a must-have feature of the home, which contains a mirror and you have to shoot the reflection of the camera, you will have to execute corrections in Adobe Photoshop or another image editing software.
The following are the primary forms of editing that can take care of the large majority of the reflections you might come across on your shoots.
However, each house is totally different and the chances that your background behind your camera will not be solid or non-patterned backgrounds may be a serious issue.
Step One: Pen Tool
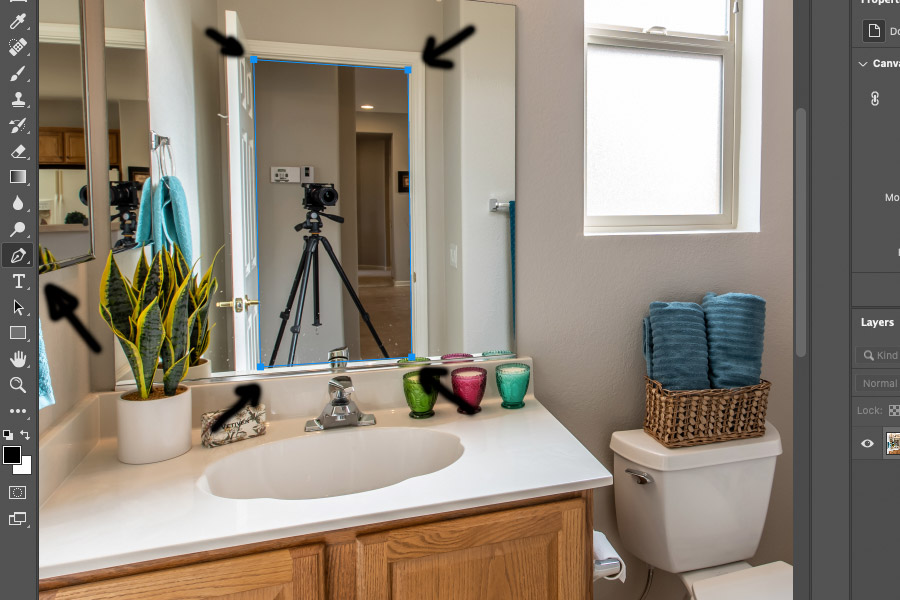
Zoom in and click the around the edge of the mirror or around the camera if shadows exist and be as precise as possible to select the area. (Click and drag points if the mirror is curved.)
Once you have connected to the final dot a path with be created. (Check your path tab on the right.)
Hold down command on a path and click the thumbnail. A selection will be made.
After the initial selection, you have several options:
Option One: Smudge Tool
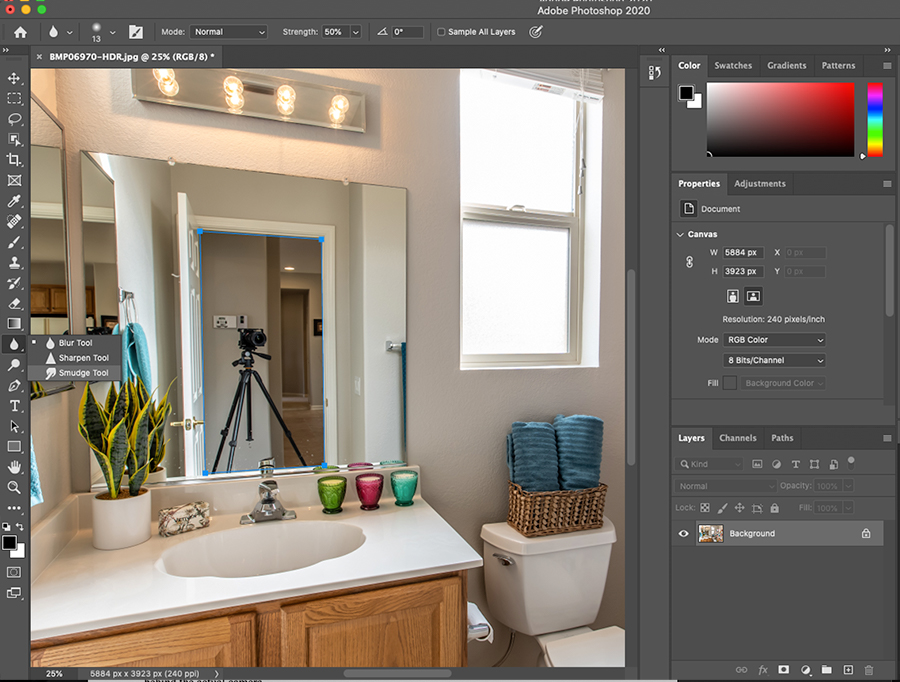
Use the smudge tool and work the camera out of the shot completely. As you can see from the image below, it will take several passes with the Photoshop smudge tool before the camera can be completely removed from the frame.
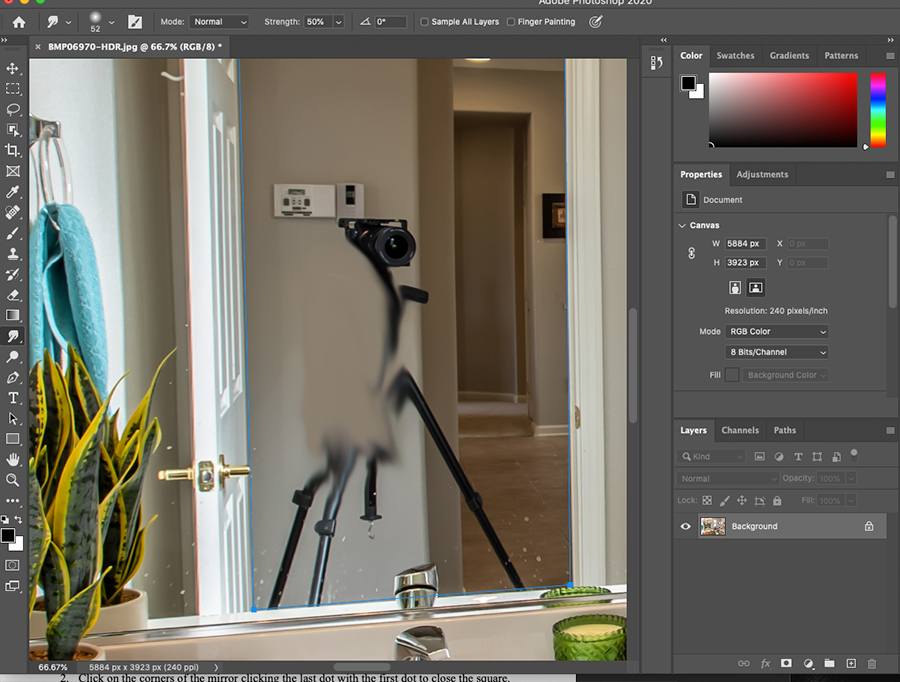
This is why you want to shoot a reflection with the camera being towards the edge of the frame because it allows you to take the smudge tool and push the camera while warping the background completely out of frame.
This is most effectively done when a mask is made with the pen tool of the mirror and duplicated over the top of the image.
Option Two: Create a Fake Mirror Reflection with the Gradient Tool
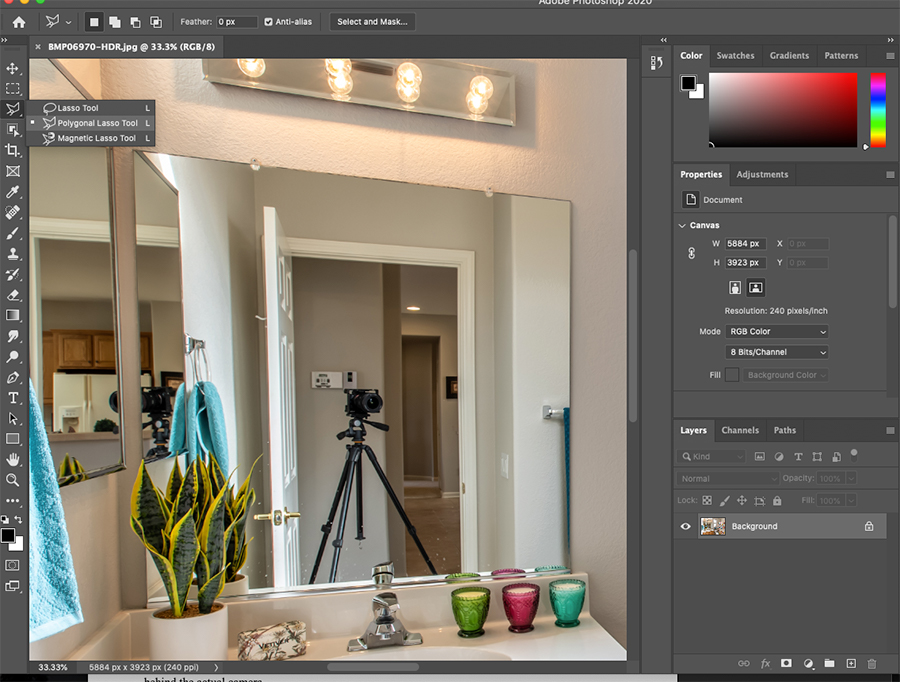
Sometimes you don’t want to actually show what the reflection of the mirror looks like because of some architectural issue or it is not pleasing to the eye.
In that case, you can create a fake mirror to replace a real-world mirror that has reflections by using the gradient tool:
- Create a new layer then make your selection of the mirror with the polygonal lasso tool on the new layer.
- Click on the corners of the mirror clicking the last dot with the first dot to close the square.
- Click the gradient tool and select a gradient that is black to white with a linear application.
- Click from one corner to the other in this layer and release it.
This will give you a replicated mirror look:
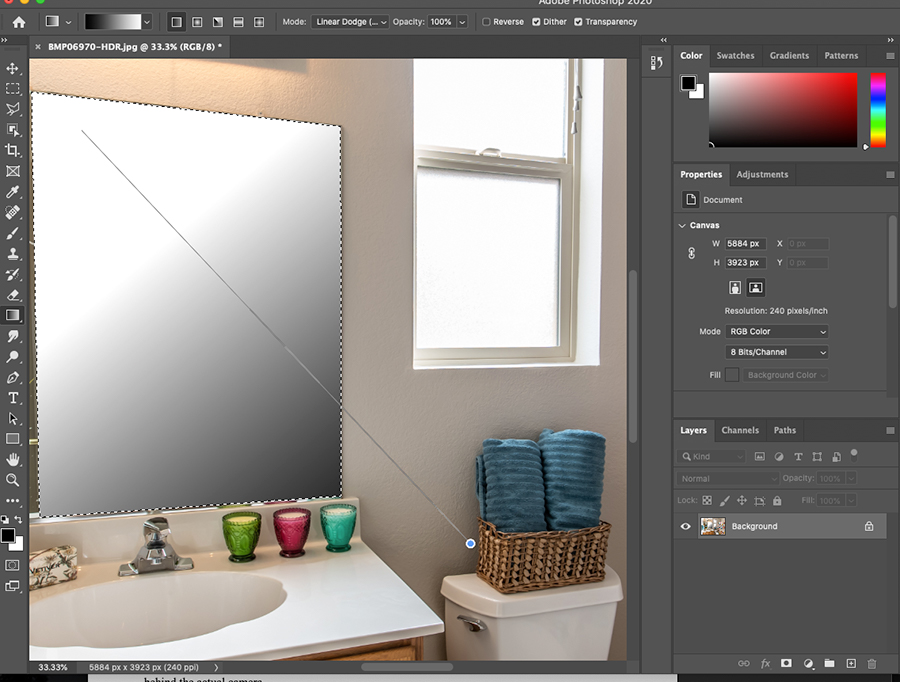
You will have to fine-tune it to make it look correct but this is a totally acceptable way of replacing a mirror.
Option Three: Spot Healing
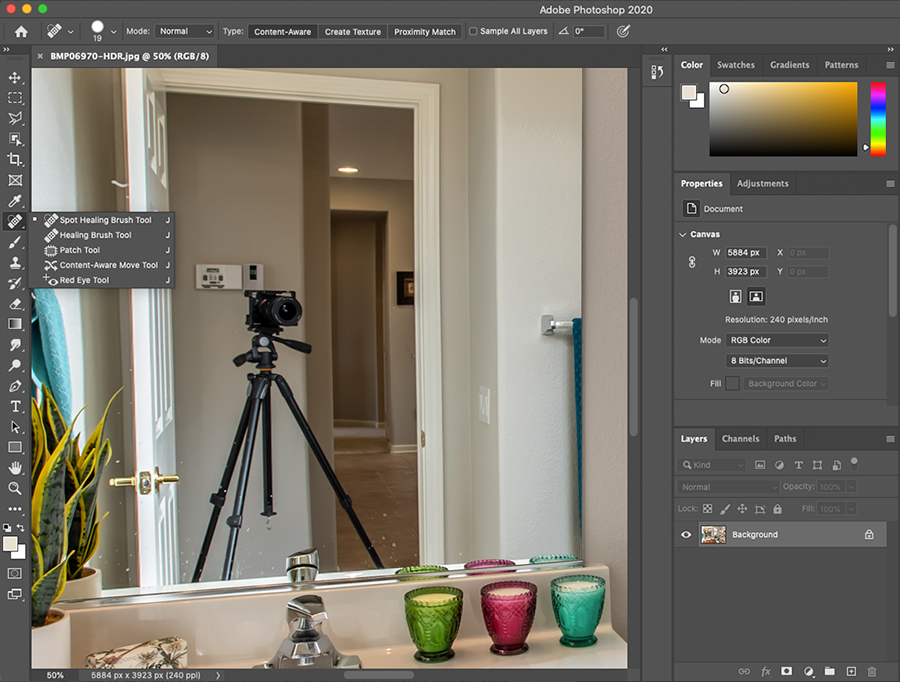
Another option is to use the Spot Healing tool in Adobe Photoshop.
Start first by using the spot healing tool and moving it over the camera in the shot.
Photoshop will then try to predict what you were actually trying to remove and or fill-in.
This is a 50-50 outcome, however.
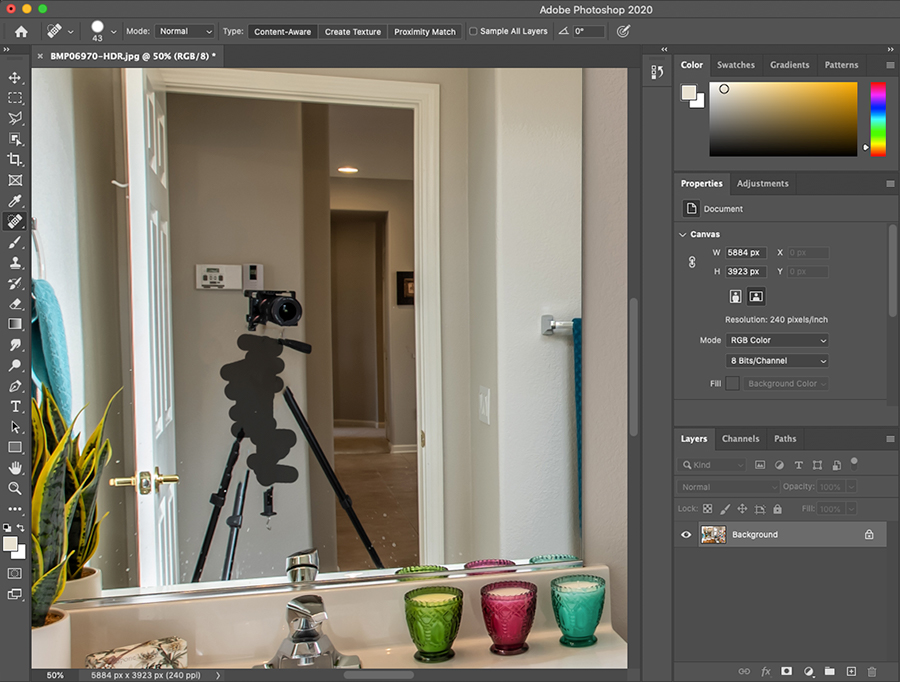
If it doesn’t work try and find an area of the image that is most like what you think is behind the camera and take the spot healing tool and alt-click the area that most represents what should be behind the actual camera.
Then click over the camera and it will fill from that area.
Option Four: Clone Stamping
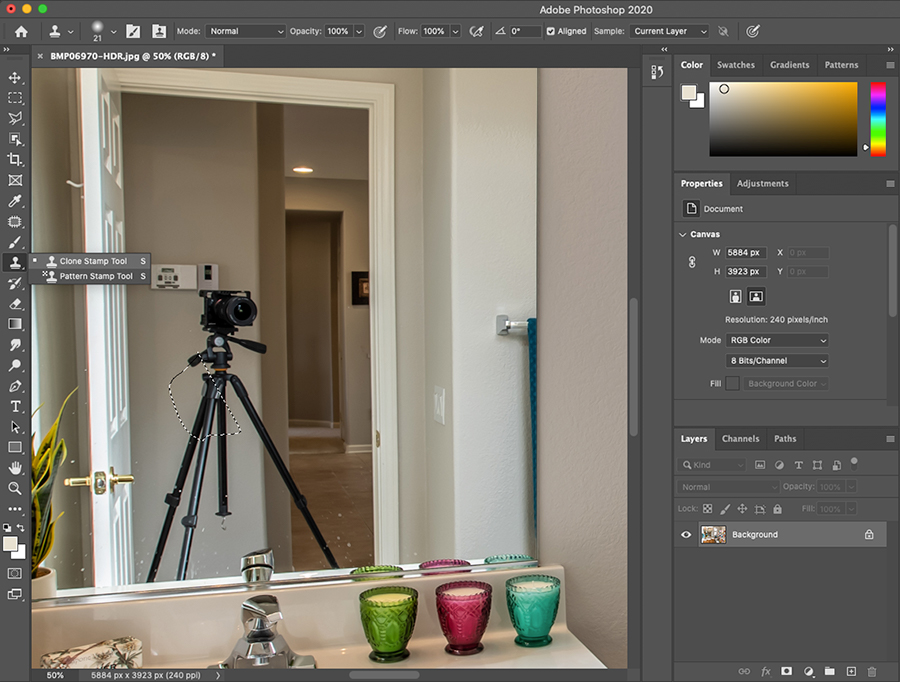
If the area behind the camera has a consistent pattern and has a flat exposure you can duplicate that pattern with a feature Photoshop has called Cone Stamping.
Click the clone stamping icon and then hover over an area that is similar to what you are trying to copy/replicate.
Adjust the tool size for the size you want and click on that area.
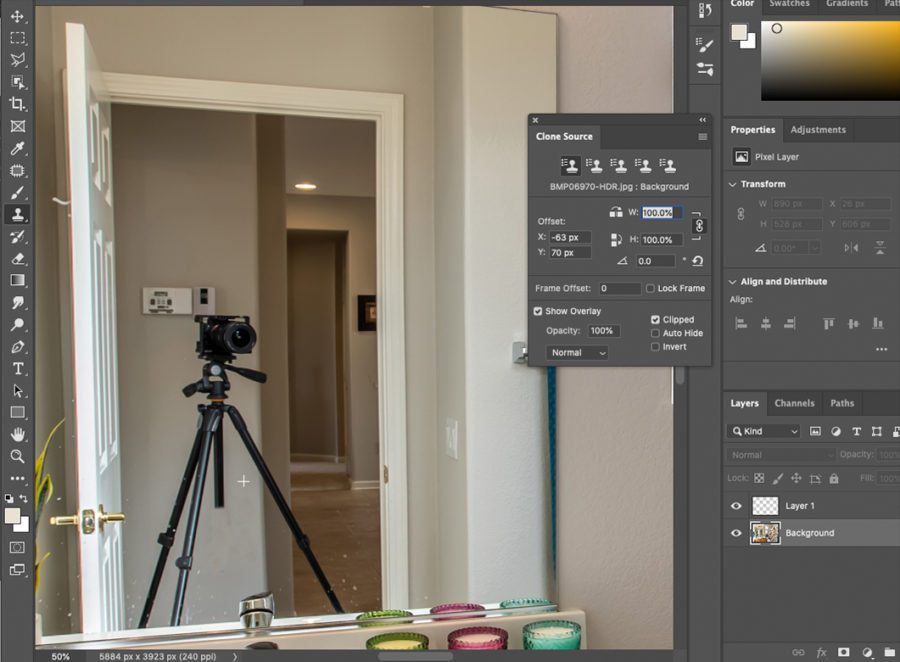
Then hover over the camera and click there as well. The cloning will begin.
Go get them mirrors
When shooting real estate videos or photos, it’s good to know a few different techniques and approaches on how to remove yourself from photographs and videos of mirrors.
Because you’ll quickly learn that every single one of your properties will be different and mirrors can be found in all sorts of places.
I hope that the techniques and approaches presented above will help remove your gear from shots.
Like I said, each home will be different so you’ll have to use different techniques from job to job.
Sometimes the answer is not straightforward but needs to be explored tested and changed. Don’t be surprised if you have to use multiple different techniques to cover up your gear in one shot.
We should aim to finesse each shot and remember every day is a new learning experience.
And remember, sometimes you’ll find that the place with the mirror is simply too tight to make for a useful photo. When that is the case, be the professional and advise against it.

