Published: September 16, 2021 | Last Updated: October 31, 2024
There are multiple methods for resizing videos on your timeline, which I’ll cover in this article. Note that resizing videos can affect the image quality, so you must choose the right way depending on your video resolution.
I’ll also cover changing aspect ratios, down- and upscaling videos, and even how to create a resizing preset.
Method 1: Scaling
The first is to change the Scaling in the Effect Controls window.
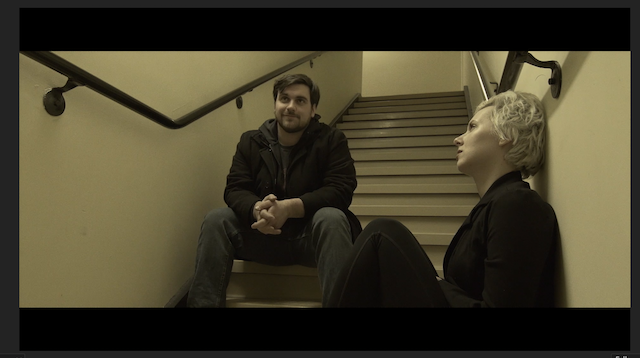
Above is an image of a typical CinemaScope 2.35:1 aspect ratio video (more on aspect ratios later). The sequence is set in the standard 1920 x 1080 resolution and 16:9 aspect ratio.
I want this image to take up the entire 16:9 frame instead of having a letterbox (black bars) around the image.
See more on how to apply cinematic black bars the right way.
All I need to do is increase the scaling until the image takes up the entire frame. You do this by clicking and dragging the Scaling until the image fills the screen.
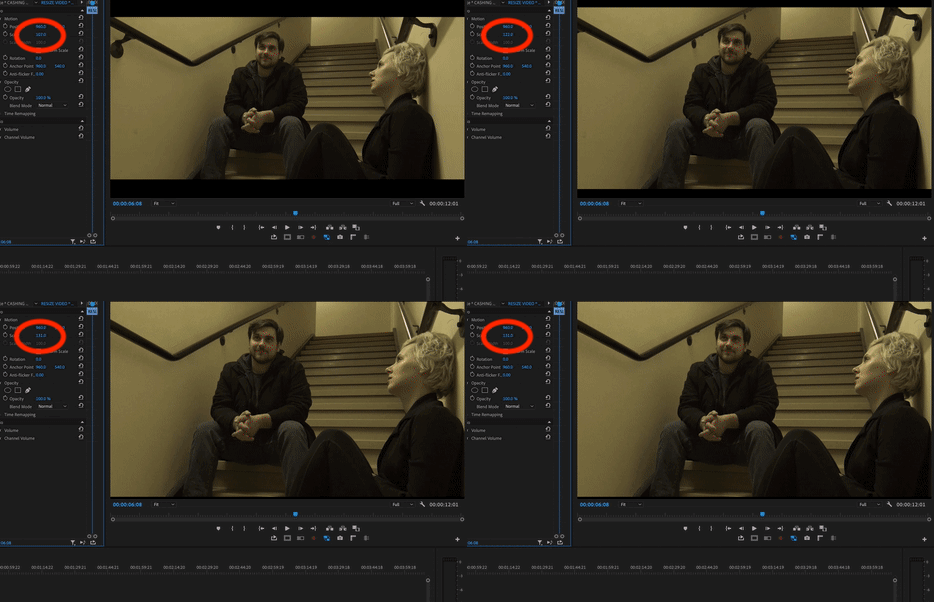
Note you may have to change the position of the image if you do not like the framing.
You can also change the height and width individually by unchecking Uniform Scale. However, this can cause your image to look stretched, so use it only when needed.

Method 2: Scale/Set to Frame Size
The next option is to use the Scale to Frame Size or Set to Frame Size. You can find these options by right-clicking your video on the timeline.

Scale to Frame Size will resample the image to fit within the timeline’s aspect ratio. Resampling is when the original image’s aspect ratio changes based on the new size.
Set to Frame Size will fit the entire image inside the new sequence’s aspect ratio.
See how to change the sequence resolution.
Let’s look at an extreme example to see how both work.
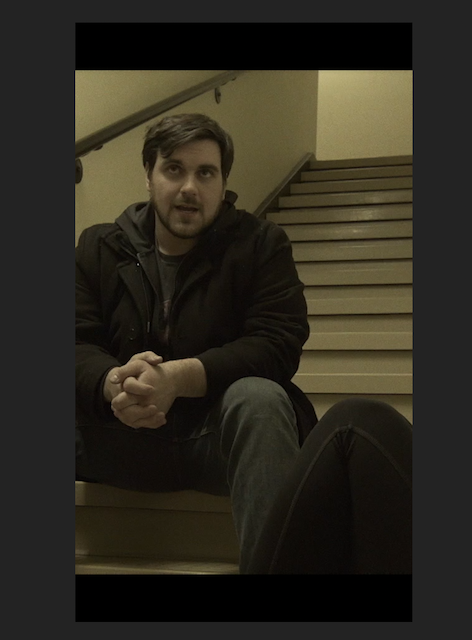
Above is a photo of the clip used earlier but on a 1080 x 1920 sequence. 1080 x 1920 is the common resolution for cell phones to show videos vertically – fx when you create a TikTok video.
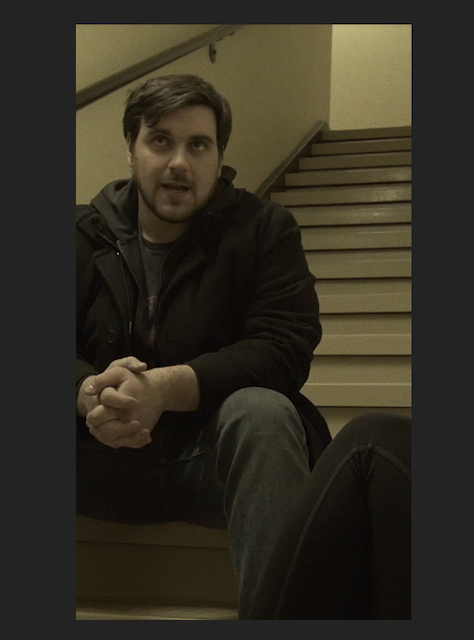
By hitting Scale to Frame Size, you can see Premiere scales the video to ensure the entire video’s aspect ratio fits inside of the timeline’s aspect ratio. The video doesn’t fit perfectly inside the timeline’s aspect ratio, so Premiere has to resample the image to make it fit.

By hitting Set to Frame Size, you can see Premiere scales the entire video to fit within the timeline’s aspect ratio.
Which option you use will depend on your preference and your project. We will get into use cases in a later section.
Method 3: Use the Transform Effect
The last method is to use the Transform effect in Premiere. This can be found on the Project Panel under Effects > Distort > Transform.

It works the same way as changing the scaling on the Effect Controls tab. This is just an additional method if you don’t want to change the actual video’s properties.
Now let’s learn about resolution and aspect ratios to understand how this can affect the image.
Video Resolutions and Aspect Ratio
The resolution of a video is defined by the number of pixels within it. A pixel is information about the image, such as color, luminance, etc. A group of pixels will effectively display your desired image.
For Instance, when you take a video on your cell phone, you’re actually taking a video of data the phone collects to display an image. So how does the image sizing work?
Think of your video like a house. A house in the US is typically measured in square footage. Resolution is like the square footage of a video. The most common resolution for HD videos is 1920 x 1080 pixels.

This pixel ratio can also be expressed in its aspect ratio. The aspect ratio is the size of the image. For instance, the standard aspect ratio for televisions and computers today is 16:9. It used to be defined in 4:3 before HD became the new norm. See the images below for how these two aspect ratios would look.

As you can see, the 16:9 is more in the shape of your standard TV today, and the 4:3 is in more of a square shape used on older TVs. We won’t get into why 16:9 is the standard, but know that this is the most common aspect ratio used today on TV, YouTube videos, video games, etc.
Read more on the history of Widescreen TV and Cinema.
You can find the aspect ratio of a video by using fractions as you did in grade school. For example, 1920 / 1080 written down to its simplest form is 16 / 9.
Any resolution’s aspect ratio can be 16:9, such as 4K being 3840 x 2160.
The resolution and aspect ratio you use will depend on your project. Movies shown in theaters typically use 1.85:1 and 2.35:1 aspect ratios. Instagram commonly uses a 1:1 aspect ratio. As you can see, there are multiple reasons why you want to choose a specific aspect ratio.
Let’s apply this knowledge inside of Premiere Pro now that you understand resolutions and aspect ratios.
Changing Resolutions and Aspect Ratios in Premiere
Let’s create a standard 1920 x 1080 resolution timeline inside of Premiere Pro. Hit File > New > Sequence.
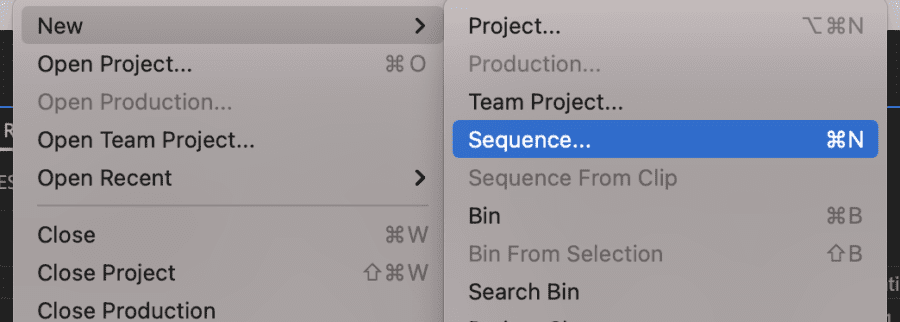
A display will pop up with some presets equipped inside of Premiere. Let’s use something more custom so we can learn how to change these settings ourselves. Go to the Settings tab in the New Sequence Window.
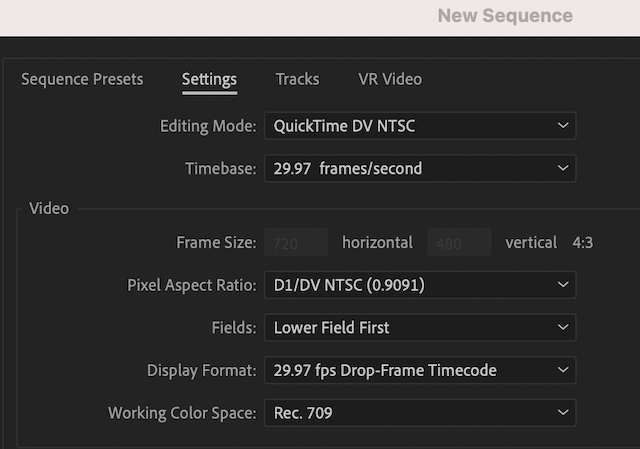
I’m just going to focus on the resolution and aspect ratio for this article. So I’ll leave the timebase (frame rate), color space, etc., as it is.
The Frame Size in the Video section is where we want to put our focus. Here is where we can input the information mentioned earlier.
Resolution is displayed in the Horizontal by Vertical format, so 1920 will be horizontal, and 1080 will be vertical. Enter this information in the appropriate box.

Next, we need to change the Pixel Aspect Ratio. In the US, the most common Pixel Aspect Ratio is Square Pixels (1.0). You will change this depending on the region in which you display your content.
Notice that the 16:9 aspect ratio we mentioned earlier is displayed next to the boxes where we entered the pixel information.
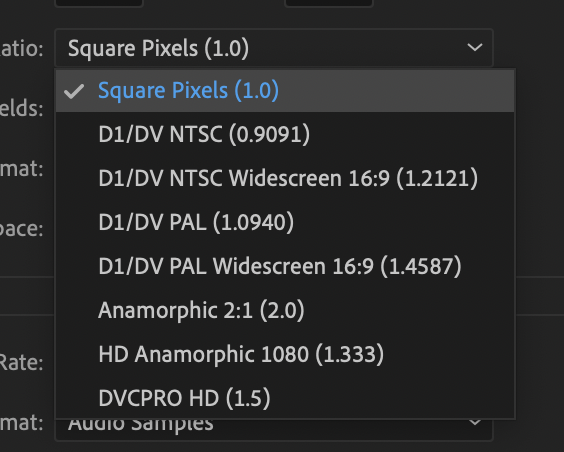
We have created our timeline with the desired pixel and aspect ratio. However, what if we want to change this information later to something else?
You can easily do this by right-clicking your timeline in the Project Panel and hitting Sequence Settings. This will display the same Settings tab used earlier to create the timeline. For example, if you want to change the timeline to 16:9 4K resolution, enter 3840 x 2160 into the resolution boxes.
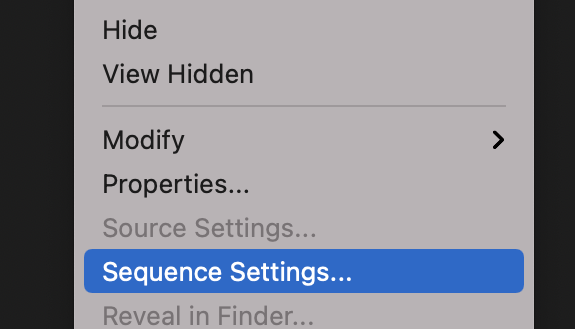
At times you will need to resize your video when the clip’s resolution is smaller than the timeline’s resolution. An example is when you place 1920 x 1080 footage on a 3840 x 2160 timeline, or vice versa. You will need to change the size of the clip to fit in the timeline.
When you change the size of the video on your timeline, you are Upscaling or Downscaling the image. Let’s briefly talk about what each of these means and how they can affect your video.
Upscaling and Downscaling
Upscaling and downscaling your video have a literal meaning: to increase or decrease the scaling of the image. This will impact your video regardless of what method you need to use.
For instance, upscaling your image from 1920 x 1080 to 3840 x 2160 will decrease the image quality because you’re essentially stretching the existing pixels. Upscaling the image too much will make the video less sharp and can create an ugly compressed look.
On the flip side, downscaling can increase the video’s image quality, such as downscaling a 3840 x 2160 video to 1920 x 1080.
This is not to say you shouldn’t upscale a 1080 video to 4K. Hollywood does it all of the time with older movies. However, you should be aware that upscaling or downscaling will change the video’s image quality.
Let’s now look at some examples of why you should resize a video.
Examples of Why You Should Resize a Video
There are many reasons you want to change the scaling of a video, but here are a few examples of why you would want to.
- You have 1920 x 1080 footage on a 4K timeline
- You need to crop out an error in your image, such as a boom pole in a shot
- You want to use parts of a YouTube video on social media and scale it to the platform’s natural aspect ratio
- You want to create two shots out of one, such as taking a medium shot of a subject and upscaling the image to create a close-up shot
- You want to reframe a shot because it was poorly framed during shooting
These are some of the most common issues I run into when I need to resize an image. Many more are not listed, but you should have a good grasp of the why.
Additional Tip: Create a resizing preset
You can create a preset inside of Premiere if you find yourself using a scaling method consistently. Set your scaling preferences in the Effect Controls tab, right-click Motion above the Scaling option, and hit Save Preset.

This will be saved in your presets, which you can easily apply to other videos by dragging it directly onto the clip.
Conclusion
As you can see, there’s a lot of different reasons why you may want to resize a video on your timeline.
Some filmmakers like Wes Anderson will use specific aspect ratios as part of his storytelling, while others may need to remove an area of a shot they don’t want to see.
Learning how to resize videos properly is an important tool to add your skillset as a video editor.
Read Next: Great Premiere Pro Shortcuts to Optimize Your Workflow (Mac & PC)

