This article will provide a basic definition and meaning of ADR, suggest some scenarios where it can be helpful, and talk about the essential tools and processes involved.
In addition, we’ll discuss some of the technology the pros use to streamline the process and get awesome results.
Table of Contents
So, what is ADR exactly?
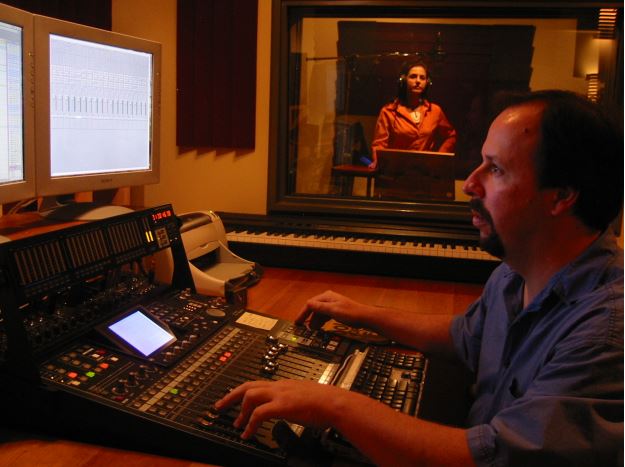
ADR stands for Automated Dialog Replacement, a post-production process for film and television in which dialog is re-recorded in a controlled environment to replace the original production dialog.
ADR is sometimes called “looping,” a term from pre-digital era ADR stages where film loops were used to repeatedly play a scene, allowing the actor to refine his performance.
Why ADR is important in film

Ideally, you took great care during production to ensure that your dialog was recorded perfectly. There were absolute “quiet on the set,” zero technical glitches, and your actors delivered every line flawlessly. Yeah…right.
Unfortunately, we live in an imperfect world, and shooting an entire film with pristine dialog and perfect performances seldom happens.
Common problems include excessive background or wind noise, sound equipment issues, and dialog that is either too loud, causing distortion, or too quiet, making it difficult to separate from the ambient noise or “room tone” on set.
These types of problems, and many more, can be solved using ADR. Here is a short, and by no means comprehensive, list of potential uses:
- Eliminating extraneous background noise from equipment, fans, traffic etc…(as mentioned above)
- Adjusting the actor’s original timing or performance
- Making alterations to the scripted dialog
- Adding or removing content for legal purposes (such as an unauthorized trademarked name)
- Replacing prohibited language for TV or airline versions of a movie
- Adding “efforts” such as grunts and groans, crying, gasping, and other non-verbal sounds for dramatic effect.
- “Dubbing” a film to another language for foreign markets
- Adding non-specific dialog, such as crowd sounds and reactions (Walla) from background actors not recorded on set.
Now that we understand some potential uses for ADR, let’s get into the “nuts and bolts” of how it’s done.
Can you do ADR yourself? A quick note about DIY ADR.
While it is possible to do ADR yourself in a home studio environment, results can vary greatly and depend on the quality of your studio equipment and the ambient noise level in your studio. After all, the whole point of ADR is to record in a “controlled environment.”
Should you choose this route, you only need a DAW (Digital Audio Workstation) or video editing software to sync audio to pictures.
You’ll also need a good mic (preferably the same type you used to record on set), headphones, and some visual or audible method to cue the actor to start their line.
Several web articles and YouTube videos describe the process for your specific software.
If you need a quick fix or some “temp” ADR for editing purposes, I’d say “go for it,” but I highly recommend using a good post-production studio for best results.
Professional audio post studios employ several (often costly) software tools and techniques and generally have the skills to achieve professional results.
Assuming you are booking a studio to record your ADR, there are some steps you need to take to get ready for the session.
How to Prep Your film for an ADR session
Once picture editing is completed, the director and audio team members will work together to determine which lines of dialog will be re-recorded and any walla (background crowd murmuring) that may be needed for the background action.
A script or cue sheet lists the individual lines and their corresponding timecodes. The studio engineer or assistant will use the cue sheet to set up markers in the DAW at the timecode locations of all lines to be recorded.
Another important aspect of planning for an ADR session is letting the recording studio know what microphones were used to record the original dialog. This allows the studio to match the sonic characteristics of the ADR as closely as possible to the production audio.
Once the decisions are made about which lines and actors will be needed, it’s time to schedule the recording sessions.
The Recording Session: What to Expect
To help sync, the actor will hear three “beeps” in the headphones, usually one second apart, before each line.
After the third beep, the actor should start the line when the fourth beep would be expected. A visual indicator on the monitor, such as a “wipe,” may also be provided as a timing reference.
For actors unfamiliar with this process, it can take some getting used to it. Delivering lines in isolation without emotional cues from the other actors while trying to match the timing of your previous performance can seem a bit daunting at first.
While recording ADR may feel awkward initially, most actors seem to adapt to it pretty quickly, and it can be a lot of fun.
As multiple takes for each line are recorded, the director and actor will hear playback in the scene and decide which takes work best.
These “select” or “circle takes” are notated by the audio engineer or assistant and then labeled for post-editing to bring them into perfect lip sync for the final audio mix.
Of course, the quality standard for dialog and ADR that filmmakers and audiences enjoy today would not be possible without some of the awe-inspiring technical achievements in computer software and hardware currently available.
Software needed for ADR – better dialog through technology
Fortunately for filmmakers and audio post professionals, the technology for cleaning up production dialog and recording and processing ADR has advanced substantially over the past few decades. Film and television dialog has never sounded better.
Many amazing software tools are dedicated to programming, cueing, editing, syncing, and even tonally matching ADR to original production dialog.
While most of the products mentioned below are geared toward audio professionals, it’s useful for filmmakers to be aware of some of the solutions available for their ADR needs.
The iZotope RX suite of plug-ins (iZotope.com) can remove unwanted sounds from your dialog track with such surgical accuracy that, in many cases, lines you would have slated for ADR in the past will no longer need it.
When you need to record ADR, iZotope’s Dialog Match can “listen” to your production dialog track sample and automatically apply equalization, room tone, and reverb to match your ADR to the original take. Pretty cool.
Steinberg’s Nuendo DAW (new.steinberg.net) now includes the Integrated ADR System, which can import cue sheets and automatically generate an ADR timeline complete with markers, cueing beeps, video wipes, and onscreen text overlays so actors can read their lines directly from the video monitor, greatly simplifying the entire process.
VoiceQ (www.voiceq.com) offers a comprehensive Mac OS recording and pre-recording applications for dubbing, ADR, audio description, voice-over, project management, and more.
Synchro Arts Vocalign plug-ins (www.synchroarts.com) set a new standard years ago for streamlining the time-consuming and often tedious process of editing ADR and vocals by analyzing the timing of original dialog and performing automatic time compression/expansion and micro-edits to sync ADR to the production track precisely.
In addition to the original Vocalign, they now offer Vocalign Ultra, including new features like pitch adjustments and enhanced time modulation. Their flagship offering, Revoice Pro 4, adds a new and improved alignment algorithm and many other advanced controls and features.
Sounds in Sync (www.soundsinsync.com) also has a cool suite of plug-ins for working with ADR in Pro Tools.
EdiCue, which won an Emmy award in 2015, allows users to log ADR cues within Pro Tools. It then creates PDF scripts in various formats and generates files that EdiPrompt can use to overlay visual cues, including prompts, text, counters, or streamers, on top of a movie window. It can also automate the ADR recording process when using Pro Tools.
EdiMarker loads Excel or Text files such as spotting session notes or any other list containing timecodes, footages, or minutes and seconds to create location markers in Pro Tools sessions, making it easy to navigate to individual ADR cues.
Given the state of ADR technology, it should come as no surprise that ADR can be, and frequently is, recorded remotely through platforms such as Source-Connect and ISDN, where digital audio and timecode can be transmitted from one studio to another via high-speed connection.
This is particularly useful when the talent is unavailable for a local session.
In Closing
As you can see, ADR is a fairly technical process, and various tools and workflows are available for getting it done.
Hopefully, this article has helped shed some light on this often misunderstood topic and served to ease any “ADR hesitancy” you might have felt.
But remember, while ADR is a great tool and can be a lifesaver for your audio, nothing beats getting it right the first time.
It is well worth your time and effort to capture clean, high-quality audio on set and keep the need for ADR to a minimum.
Up Next: What is Diegetic Sound in Film?

