Published: March 18, 2019 | Last Updated: May 21, 2025
In this article, I’ll guide you through the basic light setups for video – from 1-point- to 4-point lighting.
The information is meant as a recipe to get you started. In reality, though, nothing beats real-life experience. You are responsible for using the information and experimenting.
Key Takeaways
- Master the three-point lighting setup (key, fill, backlight) and you can do 90% of commercial work.
- Depending on placement, color, and hardness, a single light source can create multiple moods.
- Adding light modifiers and background lights can drastically enhance the look of your scene.
What is a lighting setup?
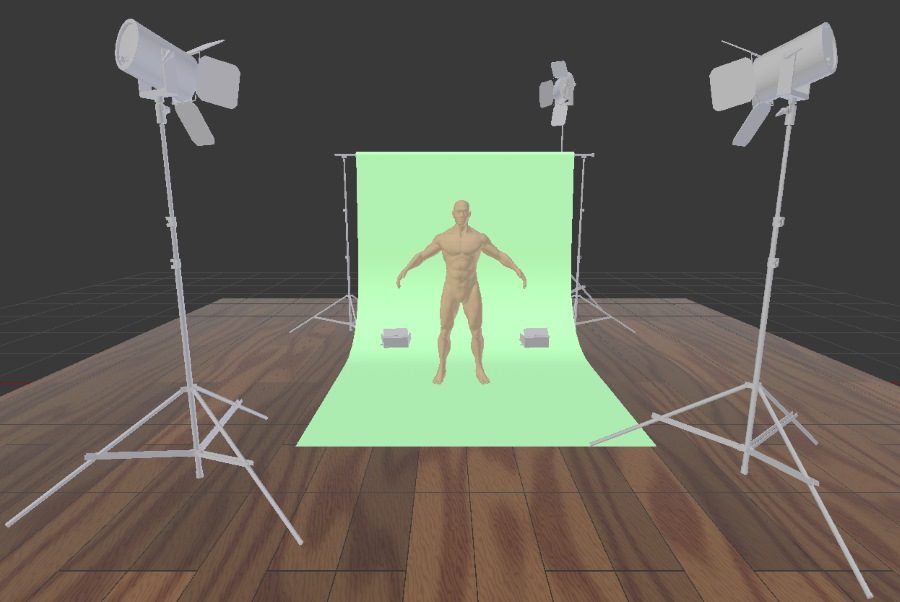
A lighting setup is how light sources are arranged in a scene to illuminate the subject in your film. You can create multiple light setups using a few light sources. It all depends on the look and feel of the scene you want to achieve.
First, let’s get familiar with the four main types of lighting:
- Key light
- Fill light
- Backlight
- Background light
Key light
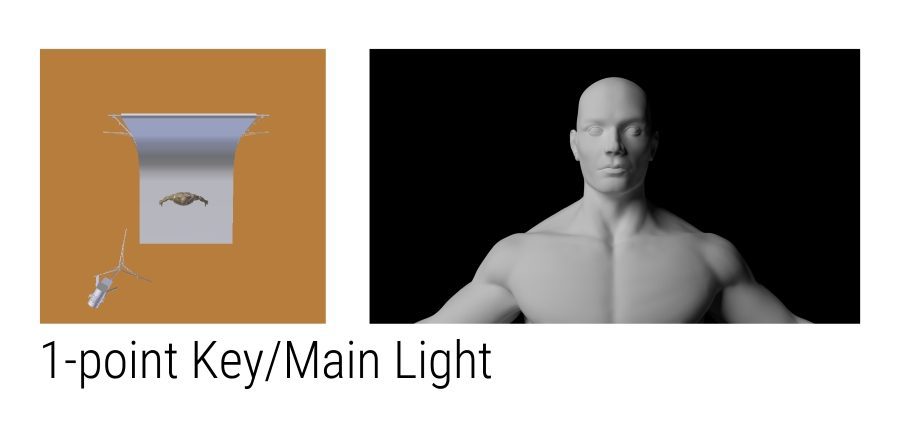
The key light is the main light source in a particular scene. Its job is to light the scene for exposure and highlight the subject’s shape and size, whether we talk about a person, animal, or object.
Sometimes, you’ll hear the terms low key and high key, which refer to the intensity of the main light and how the entire scene is lit. If it is bright and powerful, it is ‘high key.’
High-key lighting is often used in fashion by vloggers, musicals, and comedy. It gives the impression that everything is good and the subjects don’t have a care in the world. Low-key lighting is often used in drama and mystery to create suspense (what lies hidden in the shadows?).
Key lights can be soft or hard lights, depending on the look you’re after. Soft light is the most common light source for interviews and is the most flattering for most subjects.
A fresnel or an LED panel with a large softbox is a common choice for this lighting setup. For vloggers, I’d recommend a ring light as they give a nice, soft look and don’t take up much space.
If you want to achieve a more dramatic look, e.g., if you’re shooting a dramatic scene or a scene in a neo-noir short film, you’ll want to go with a hard light to create a high-contrast scene with hard, edgy shadows.
Fill light
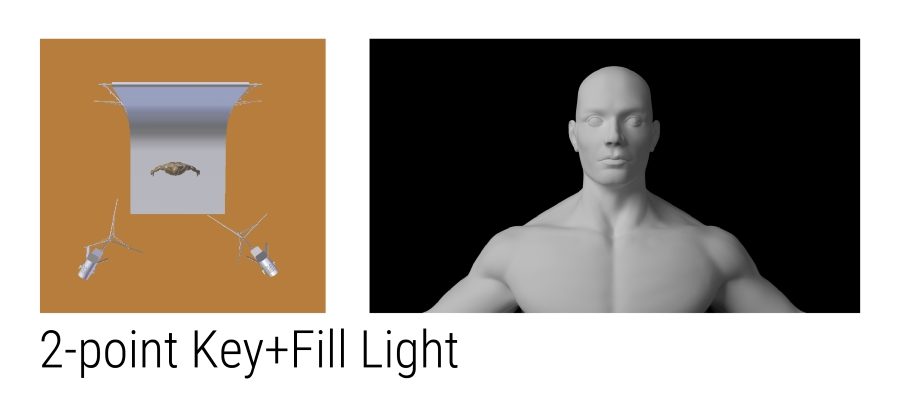
The fill light fills some of the shadow cast by the key light on a subject. It brings back some details in the shadowy part of the subject, e.g., an actor’s face. A fill light also reduces the contrast and dynamic range in a scene.
Fill lights are often soft lights with a lower intensity than the key light. However, if you’re going for a bright, high-key look, fill lights can be brighter than the main light.
Creating a fill light doesn’t necessarily require a lamp. Fx, you can use a reflector to bounce back the key light onto the subject and have it act as a fill light. You can also use a white wall or the natural ambient light from the windows. Just make sure the fill light doesn’t overpower the key light.
Backlighting
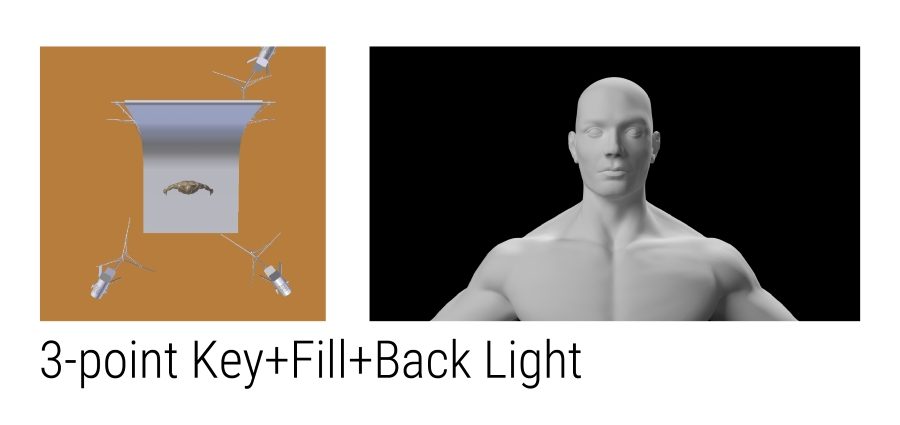
The backlight illuminates the foreground elements (such as an actor, interviewee, or object) from behind and separates the subject from the background.
Backlights often highlight the edge of an actor’s hair and shoulders. Because of this, backlighting is also known as hair and shoulder lights or rim lights. When backlights are placed directly behind a subject to create a silhouette, it is sometimes called a kicker light.
Backlighting sometimes creates a glowing halo effect around a person to insinuate that the person is good, ethereal, or angelic.
Backlighting can be natural (e.g., light coming in from a window in the background) or artificially created with LED panels, fluorescent tubes, car headlights, or even ordinary interior household lamps (like the lamp on your bedside table) or a candle.
Using such everyday items is also called practical lighting. Using a typical lamp in your living room shines a light on the actor and the background/scene.
When you try to imitate natural lighting, e.g., when you place a strong fresnel outside a window to imitate sunlight or a lamp to imitate a television, it is called motivated lighting.
If you’re looking for budget-friendly lighting kits, see my article about Affordable LED Lighting Kits For Video.
Background light
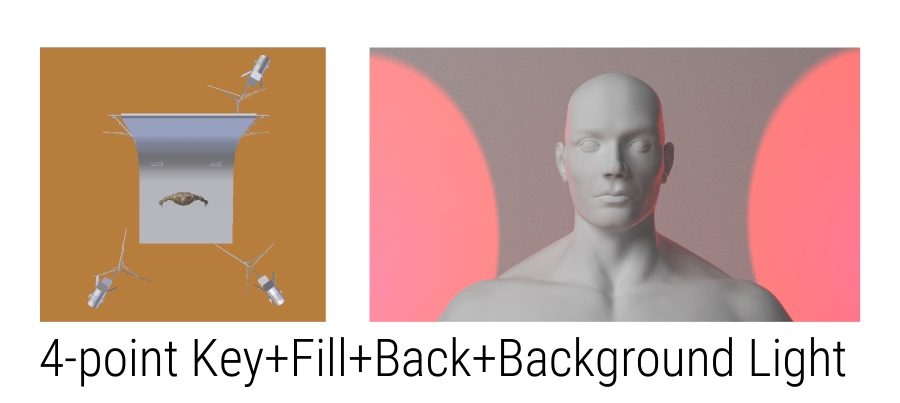
Background lights cast light on the background elements of a scene to create a visual delimitation between the subject and the background elements. They are usually placed last and positioned behind the subject.
Background lights are often used to add depth to a scene or to create a particular atmosphere.
Sometimes, the background light is equipped with a color filter to make the foreground elements stand out. Using a Dedolight with a cookie is also common to create a pattern on the wall behind the subject.
How to create vastly different moods with just one light source
A one-point lighting setup is a videographer or photographer’s simplest light arrangement. If you bring your camera outside to snap a photo in the sun (and there are no other light sources), you already use 1-point lighting.
However, you can do many things with only a single light source. For example, you can choose between natural or artificial light, hard or soft light, tungsten or daylight-balanced light, colored gels or cookies, etc.
Where you place your light source (and its hardness) significantly influences your result. Let’s look at a few common light positions.
3/4 Front Light

The ¾ front light is the most common way to utilize a key light. It makes up the basis for many other types of lighting setups.
You place the key light in front of your subject at an angle between 15 and 45 degrees from the front center.
You can also place the light slightly above or below the eye level to achieve interesting shadows on your subject’s face.
This lighting setup reveals many details on the part of the face illuminated by the key light. The other part of the face will have shadows, which are more or less hard depending on the softness of the light you use.
Look at the video below from DP Lumi for some examples of placing your key light.
Top Light
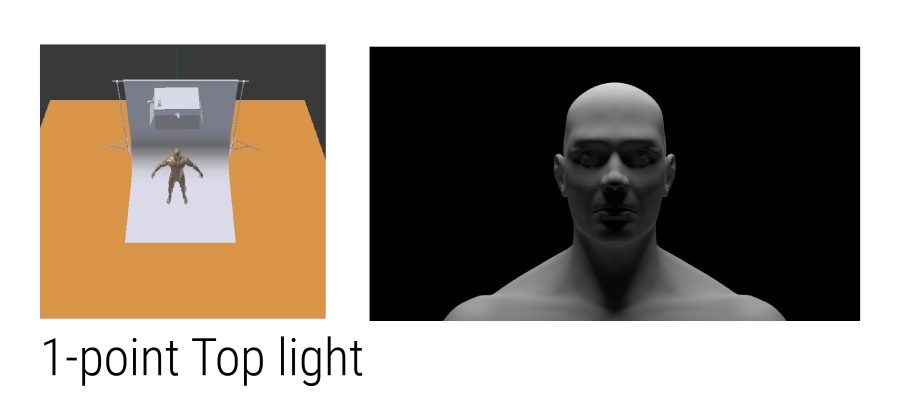
A top light is when you place a light above your subject. The key light casts deep shadows under the eyes, nose, and chin. This lighting setup emphasizes the subject’s cheekbones, making it suitable for scenes with a lot of suspense.
Try placing the top light directly above your subject and let the model wear a hat, e.g., a fedora. You can get a cool detective vibe from the shadows cast by the fedora onto your subject’s face.
Bottom Light, aka Under Lighting
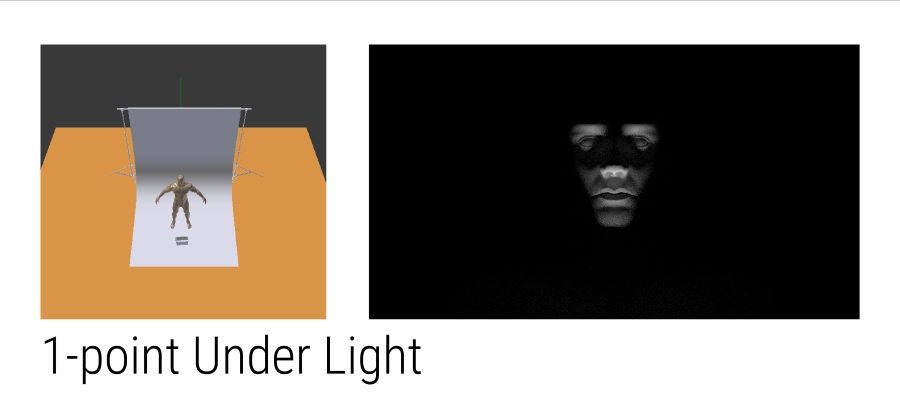
In a bottom light setup, you place the key light close to the floor, illuminating your subject from below. This setup is called ‘under lighting’ and is often used for a spooky effect.
If you’ve ever tried to spook your friends as a kid by holding a flashlight directly below your chin and lit up your face, then you’ve already used a bottom light.
Front Light
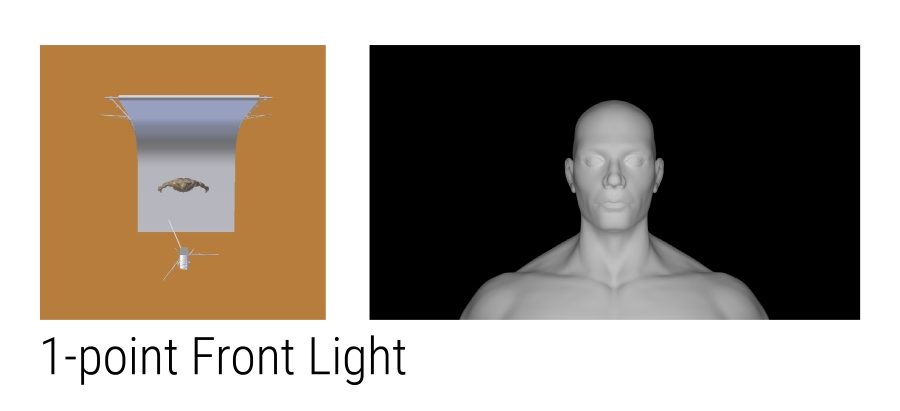
As the name suggests, in front lighting, you place the key light in front of your subject.
If you’re filming your subject from the front, you can place the light next to or slightly above the camera or use an on-camera light or right light mounted on your camera.
This setup will illuminate the subject directly and cast an even amount of light on his or her face, allowing you to see plenty of details on the skin. You can use soft and hard lights when creating a front-light setup.
Side Light
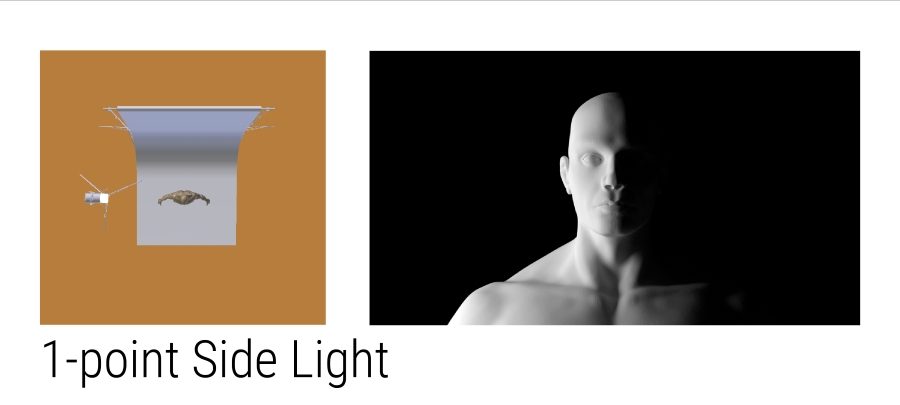
With a side light, you place a light next to an actor and light the face from the side.
This will result in one side of the character being illuminated while the other is in darkness. The harder the light, the stronger the contrast and effect will be.
3/4 Back Light
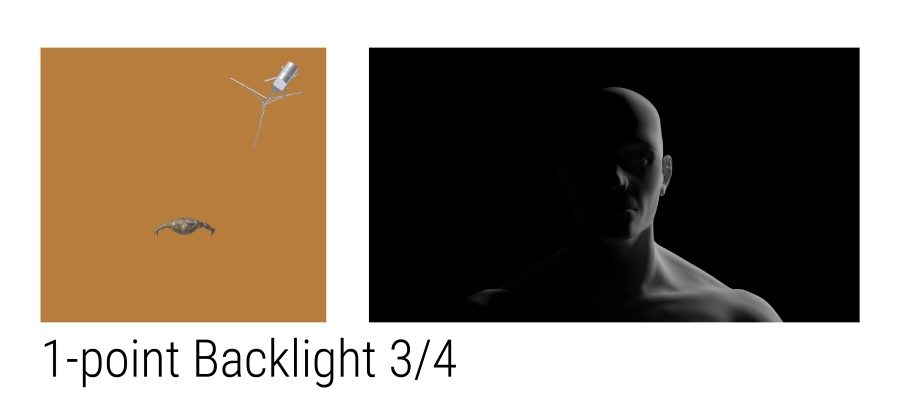
This lighting setup is very similar to the 3/4 front light, except the key light is placed on the back side of the subject. The ideal angle would be between 15 and 45 degrees on either side, perpendicular to the front-to-back center line of your subject.
This lighting setup reveals many hair details and shadows the subject’s face. Depending on the angle of the key light, you might be able to see some details on the face, but not much. This setup might be suitable for scenes with suspense and mystery.
1-point backlighting
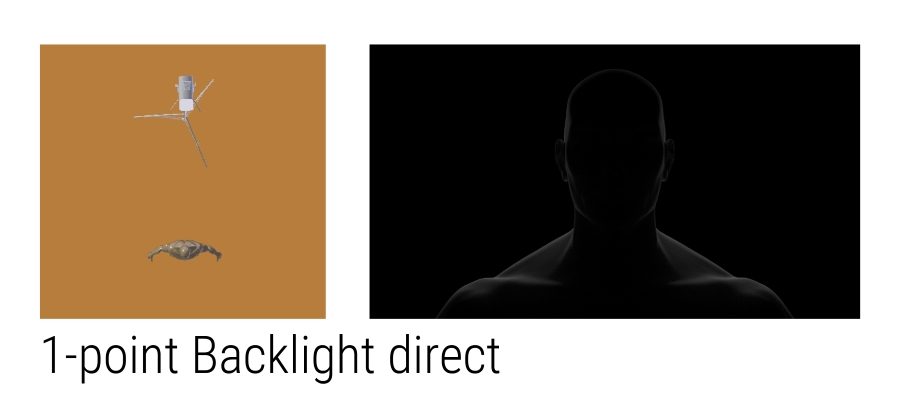
When you place a single light source directly behind a subject, you can create a silhouette kicker or a halo effect, depending on the type of light you’re using.
Also, try placing the light behind your subject’s head, back, and feet and see what it does for the subject and scene.
This is a great way to light fx a killer stepping out of the shadows where you don’t want to reveal the face yet.
How to create a 2-point lighting setup
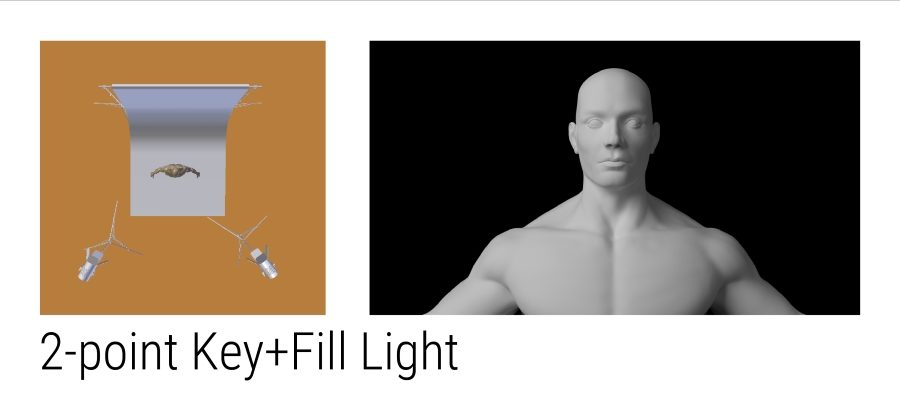
The 2-point lighting setup is typical in videography, especially for run-and-gun interviews. It consists of a key light and a fill light.
For interviews, soft lights are most commonly used when you’re first starting. Soft lights are more flattering for your subject and more manageable when positioning.
Here’s a step-by-step guide to get you started on a basic 2-point lighting setup:
- Place your key light at 45 degrees off-axis from the centerline between your camera and the subject.
- Place your key light on the opposite side of your subject’s position in the frame.
- Fx, if your subject is placed on the right side of your frame, the light should be positioned on the camera’s left side.
- Place your key light on the opposite side of your subject’s position in the frame.
- Raise the light stand so that the light points downwards at a 45-degree angle.
- Use an umbrella or softbox to cover the light source to create a nice diffused soft light on your subject.
- Adjust the brightness of the key light depending on your preferences.
- Now, place the fill light on the opposite side of the subject at a 45-degree angle.
- Adjust the power of the fill light to approximately 50 percent of the key light.
- Start with daylight-balanced color temperature on both lamps.
Start with these eight steps above to get a feel for the basic 2-point lighting setup.
When you feel you’ve achieved a good look, you can start playing around with the different lamps’ positioning, the light’s hardness, and the color temperature. Notice how changing three parameters dramatically changes the scene’s look.
If you haven’t got two lamps, you can use a reflector or the light coming through a window as a fill light.
How to create a 3-point lighting setup

A basic three-point lighting setup consists of a key light, a fill light, and a backlight.
The steps to make a basic 3-point lighting setup are very similar to the 2-point basic lighting setup described above. All you have to do is add a backlight.
Below is a step-by-step guide to get you started on a basic 3-point lighting setup.
The first six steps are identical to the 2-point lighting setup described above. From there:
- Place the backlight behind your subject above the head at an angle and on the same side as your fill light. Try putting it at a 45-degree angle, pointing slightly downwards.
- Remember, the backlight should illuminate your subject’s hair and shoulders and add depth and separation between the subject and the background.
- Be careful where you place your backlight. You don’t want the light stand to end up in the frame.
- Start by adjusting the backlight’s power to approximately 50 percent of the key light, then adjust to taste.
- Use daylight-balanced color temperature on all three lamps to ensure a balanced scene. After that, you can always experiment with gels and other modifications.
Use a diffuser (such as a softbox) with your backlight if you think it’s too powerful. You can also use diffusion gels to give the hair a particular tint, like blue or orange.
If you’re filming indoors, you can use the sunlight from a window. If the sunlight is too powerful, use it as a backlight, illuminating the subject from behind. You can also use it as a key light.
The three-point lighting setup is common for interviews and other applications, but does it mean it is always the right choice?
I recommend you watch the video below by Wolfcrow. In it, he discusses three-point lighting, when to use it, and when not to use it.
So, before you go out and create a three-point lighting setup for your next shoot, you should ask yourself what you’re trying to accomplish.
How to create a 4-point lighting setup

A basic four-point lighting setup consists of a key light, a fill light, a backlight, and a background light.
Below, you’ll find a step-by-step guide to get you started on a basic 4-point lighting setup, which expands upon the 3-point lighting setup. From there:
- Add your background light.
- Try placing it on the floor and letting it light the wall from beneath. Or place it on either side of your subject.
- In either case, ensure the light or light stand doesn’t end up in your frame.
- Start by adjusting the power of the background light to approximately 30 percent of your key light and then adjust to taste.
- You’ll want it to help create a nice separation between the subject and the background and add some interest to the scene, but not to simultaneously draw too much attention to the background.
- Use daylight-balanced color temperature on all four lamps to ensure a balanced scene. After that, you can always experiment with gels and other modifications. The background light can benefit from using a cookie (e.g., if it is a bare, boring wall) or some colored gels.
There you have it. Follow these simple instructions step-by-step, and you’ll be on your way to creating the most common basic lighting setups. When you have the basics down, I urge you to go exploring.
Creating good lighting isn’t an exact science. It depends on the scene, the mood you want to convey, and many others. So be creative.
For example, while using a fill light is common, it is unnecessary. The lovely and talented Eve Hazelton from Realm Pictures in the video below builds a scene without any fill lights.
That said, knowing the basics and working from there is always a good idea. If something doesn’t work, you can always fall back to a basic setup that works and rework the scene from there.
If you have any comments or questions, please let me know in the comments.
Read Next: Want to explore how lighting transforms the mood of a scene?
Browse all lighting articles, from hard and soft light to color temperature, contrast, and key light setups.
Or return to the Cinematography section for lenses, framing, and camera movement techniques.
Here’s your pin for later:


